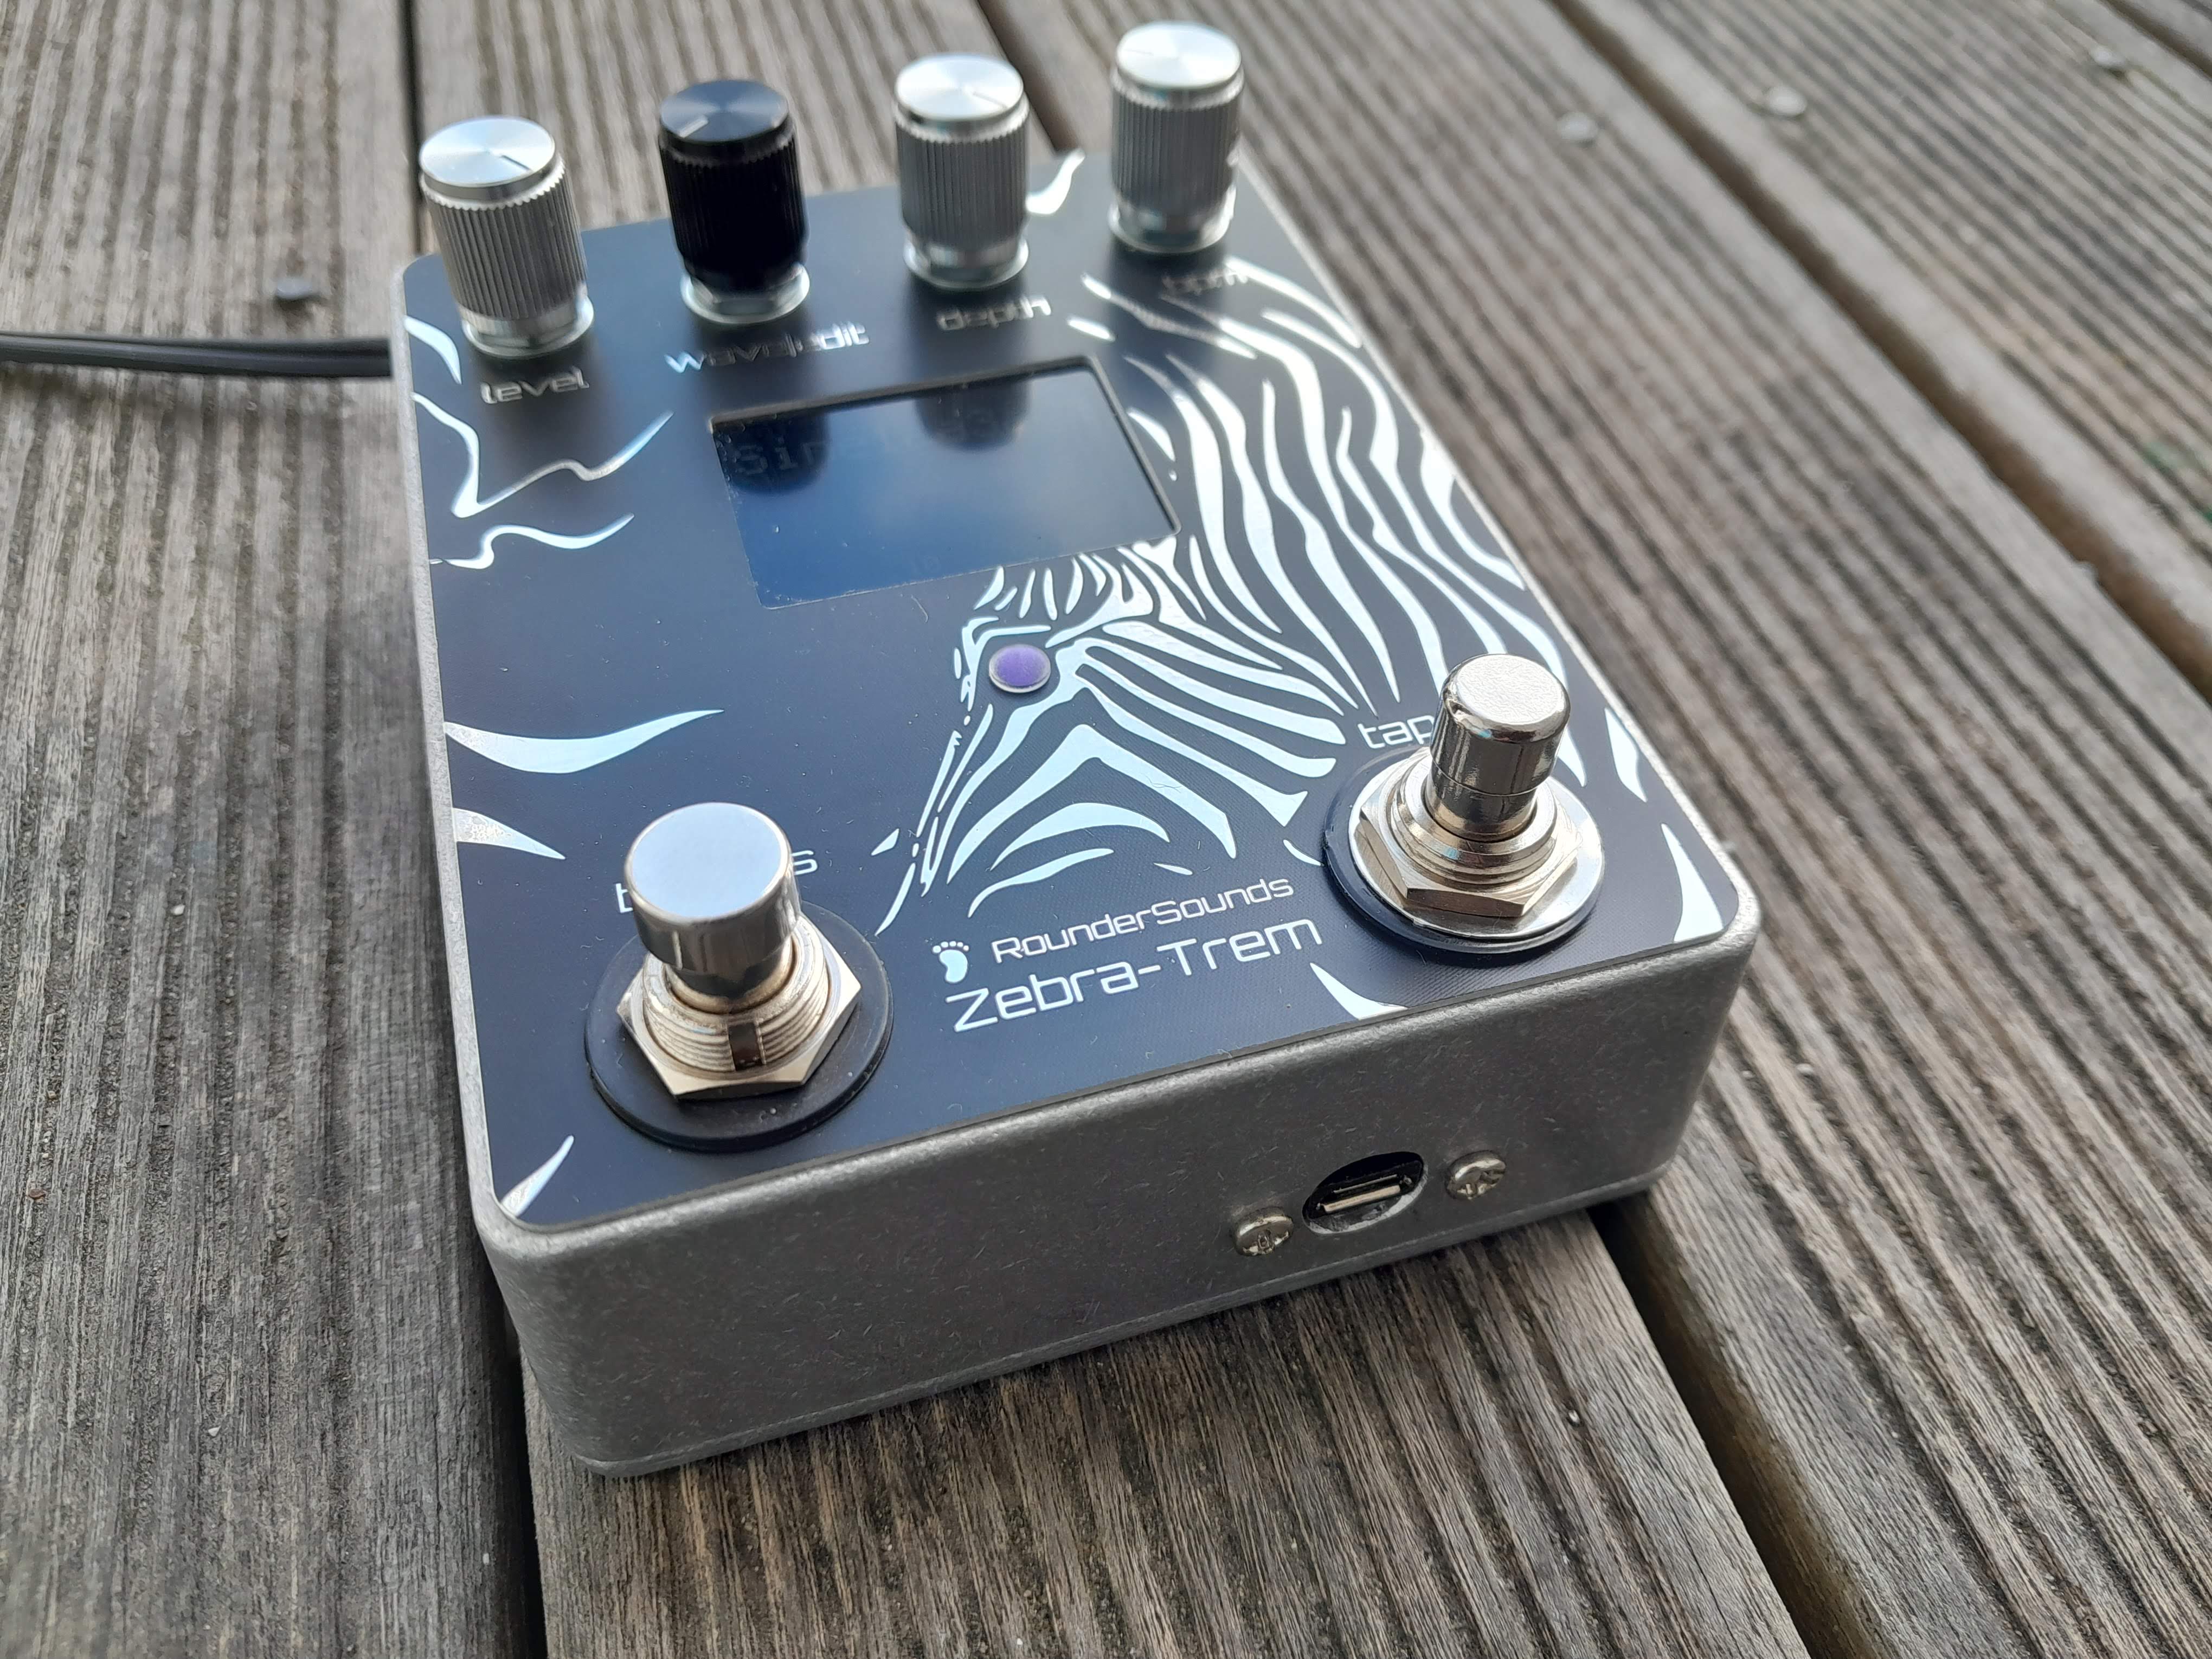
Zebra-Trem
The world's only rhythmic tremolo pedal with tap tempo and on-pedal waveform editing. Software updates, which we're continually working on to improve your experience, will always be free.
- Photos
- Videos
- Quick start
- Waveform editing
- Downloads
- Spec
- USB functions
- Advanced
- Buy
- Feedback
- Thanks
Ryan gets glitchy with the Zebra-Trem
We made it into Tri Pedal Reviews' top 10 of 2023!
Here we are, alongside Meris, EHX, Strymon, UA, Chase Bliss...
Building a waveform
Bill (inventor of the Zebra-Trem) builds a waveform from scratch, and talks about how to analyse a rhythm.
Review by Brett Kingman
Review by Tri Pedal Reviews
This video covers most of what the Zebra-Trem has to offer, starting with rhythmic waveforms, moving onto standard waveforms, and finishing up with editing.
Demonstrating some rhythmic waveforms
This video illustrates the idea of a "rhythmic" tremolo.
How Soon waveform demo
This video shows how to get a sound similar to the tremolo in How Soon is Now by The Smiths.
Editing simple waveforms
This video shows how to edit a simple waveform.
Editing complex waveforms
This 12-minute video goes into the details of editing a complex waveform. There are timestamps in the description.
Choppy square and sawtooth demos
These videos show the maximum "choppy-ness" achievable on the Zebra-Trem.
If you have a video to share, we'd love to hear about it!
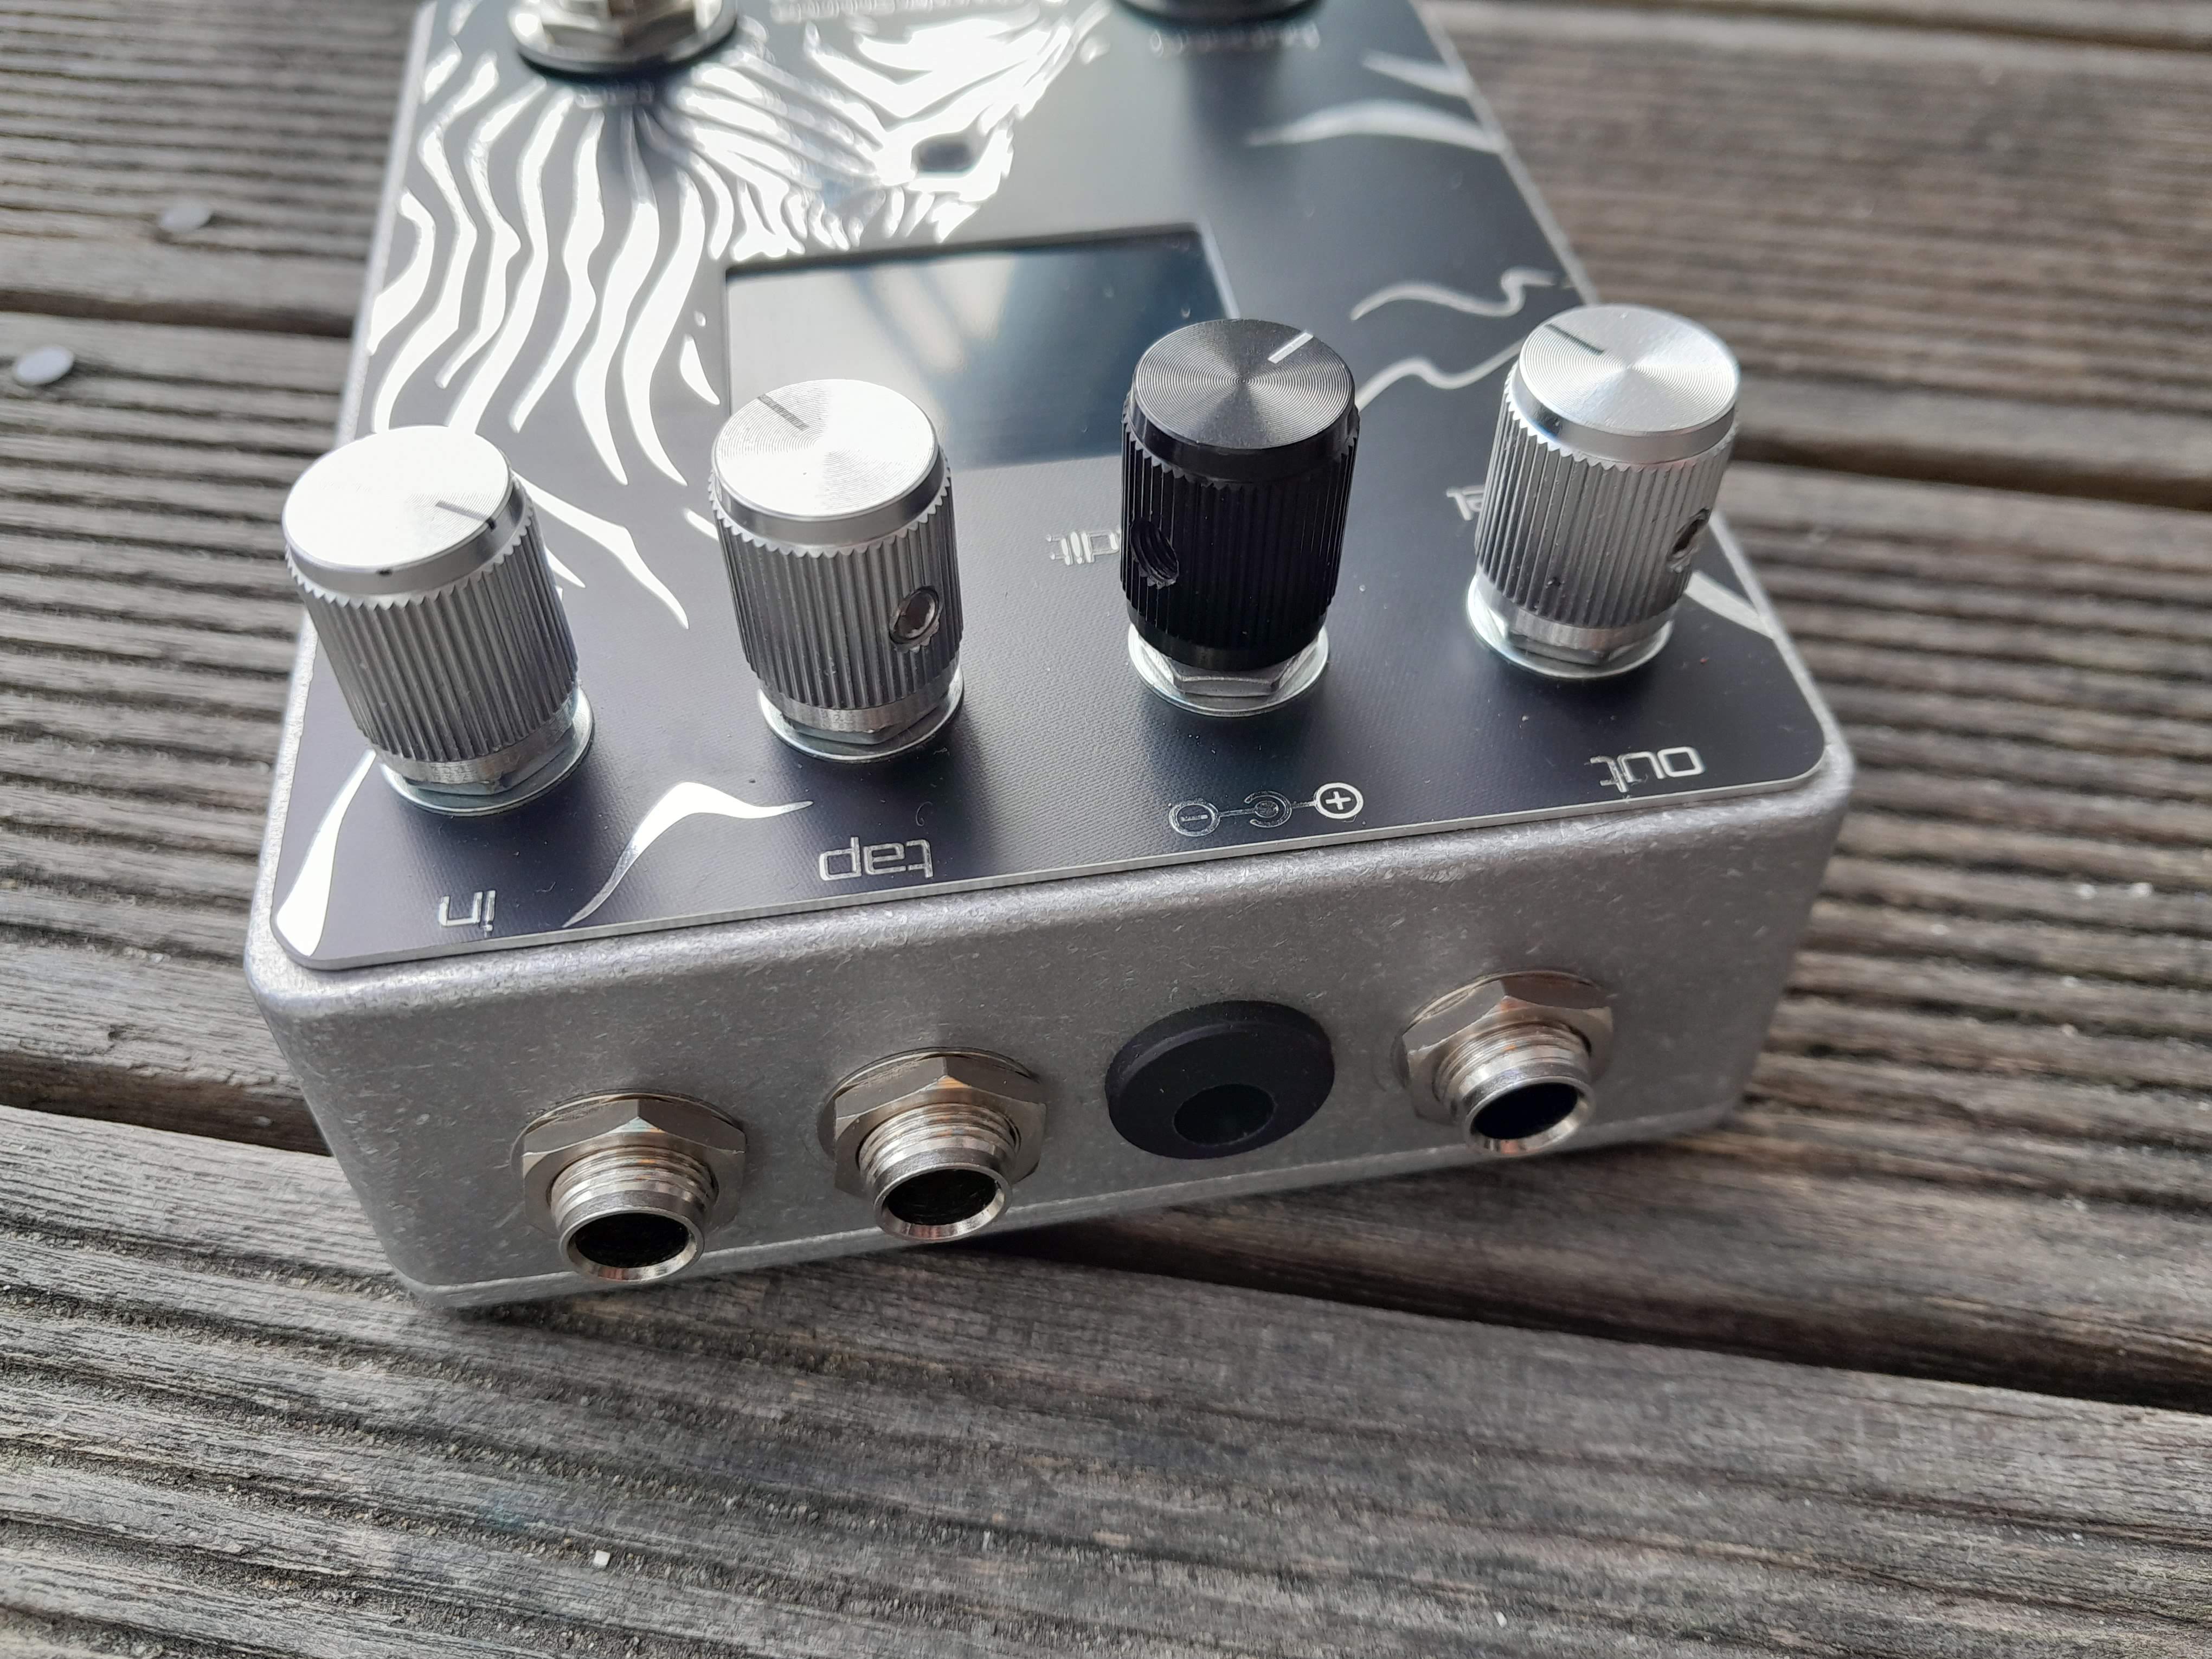
Connections
The power supply can be anywhere from 9V to 18V, centre-negative. A good quality isolated supply is highly recommended.
Mono instrument in and out.
Operation
Turn the waveform knob to select the waveform you want.
Press the wave|edit knob down to modify a waveform. (On some pedals, instead of pressing the edit knob, you'll need to click the edit button located just above the power jack).
Adjust level and depth to taste.
Use the bpm knob or the tap footswitch to set the tempo.
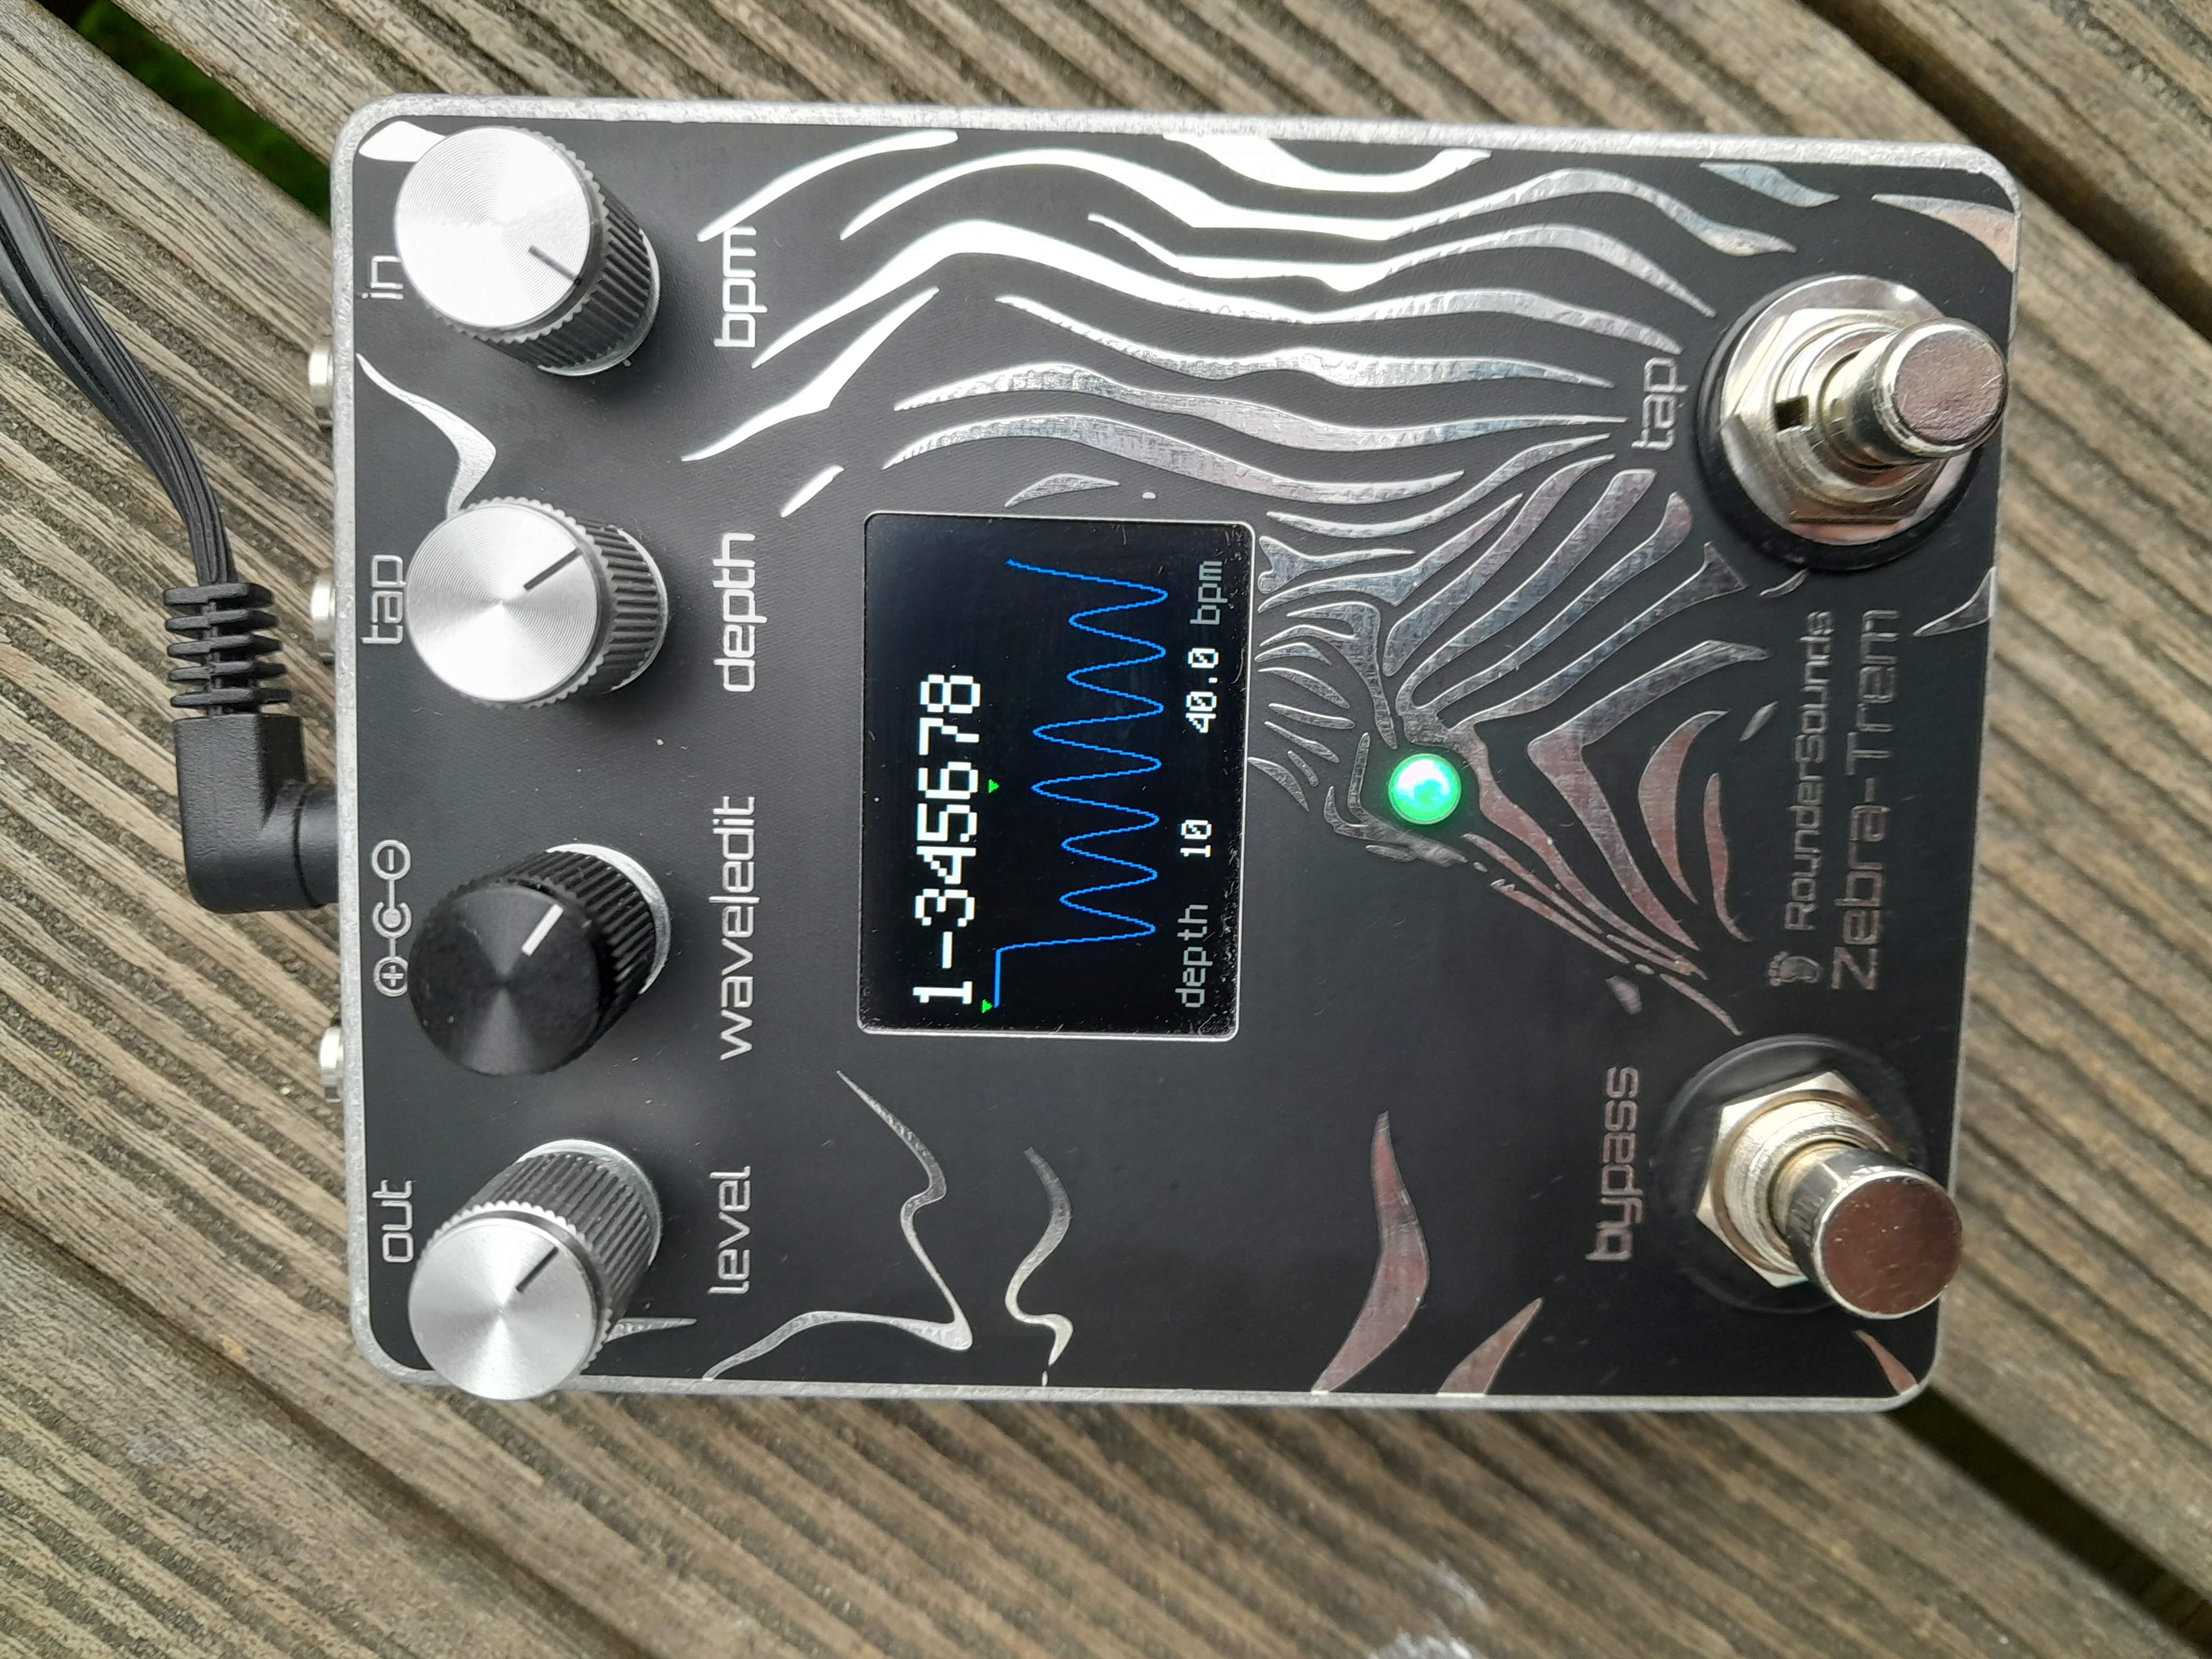
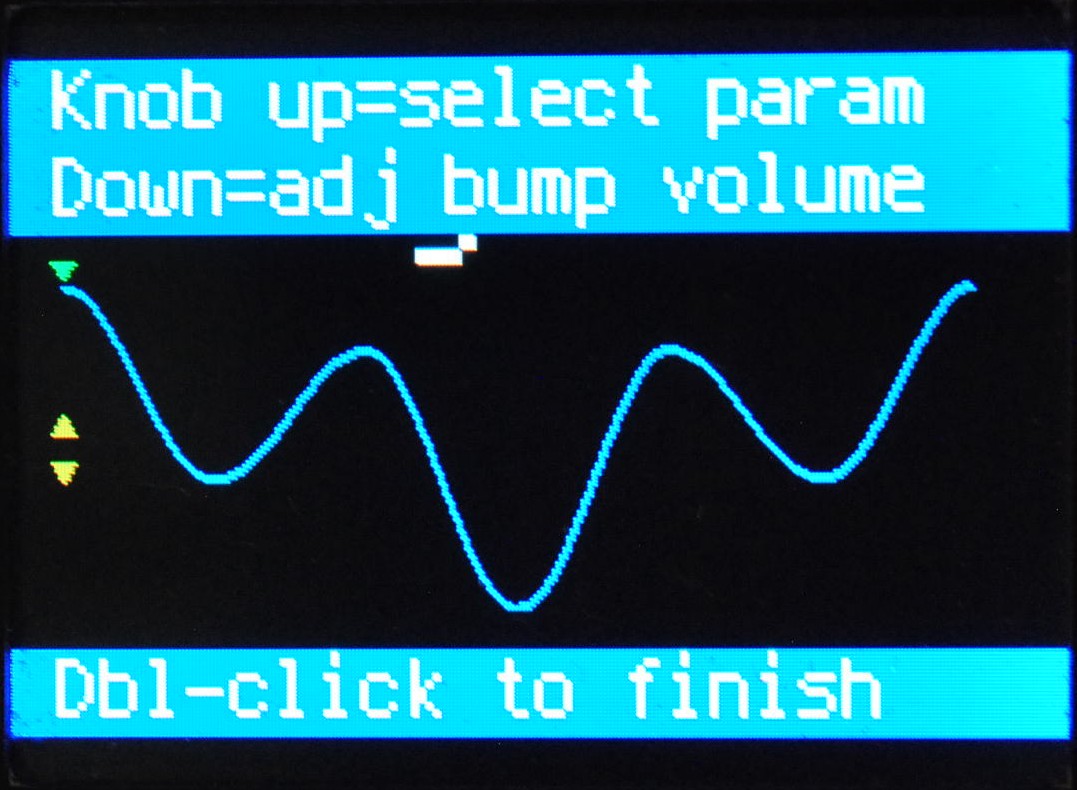
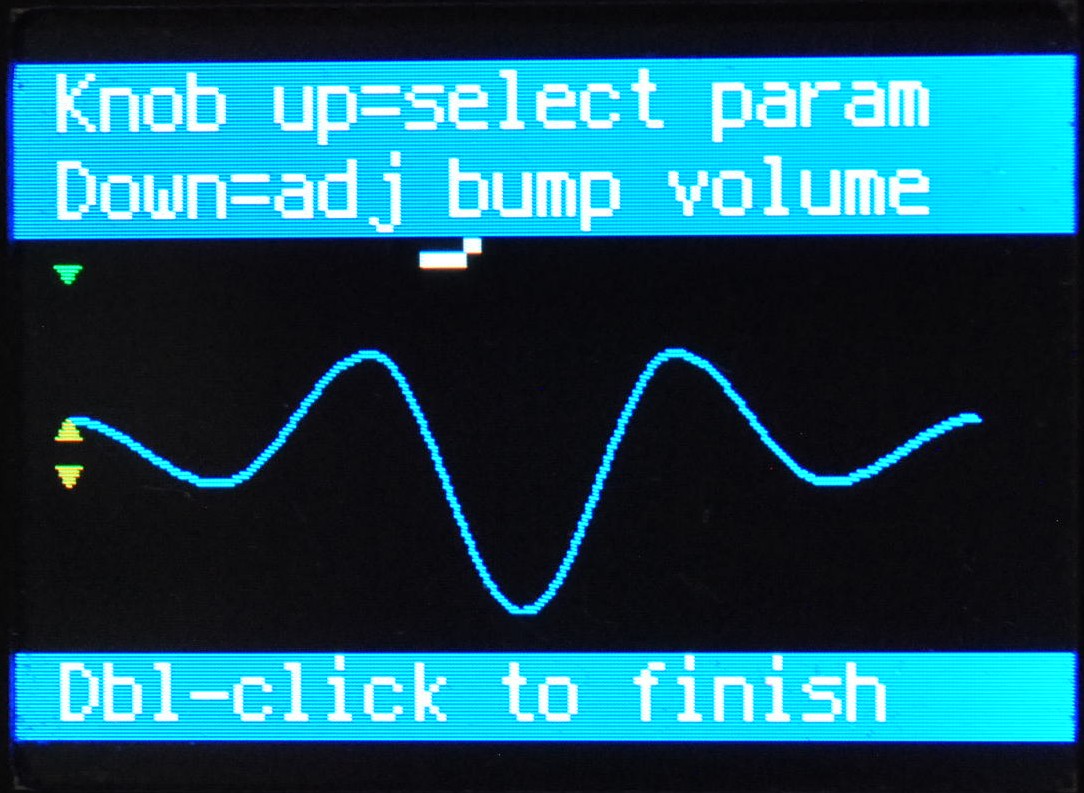
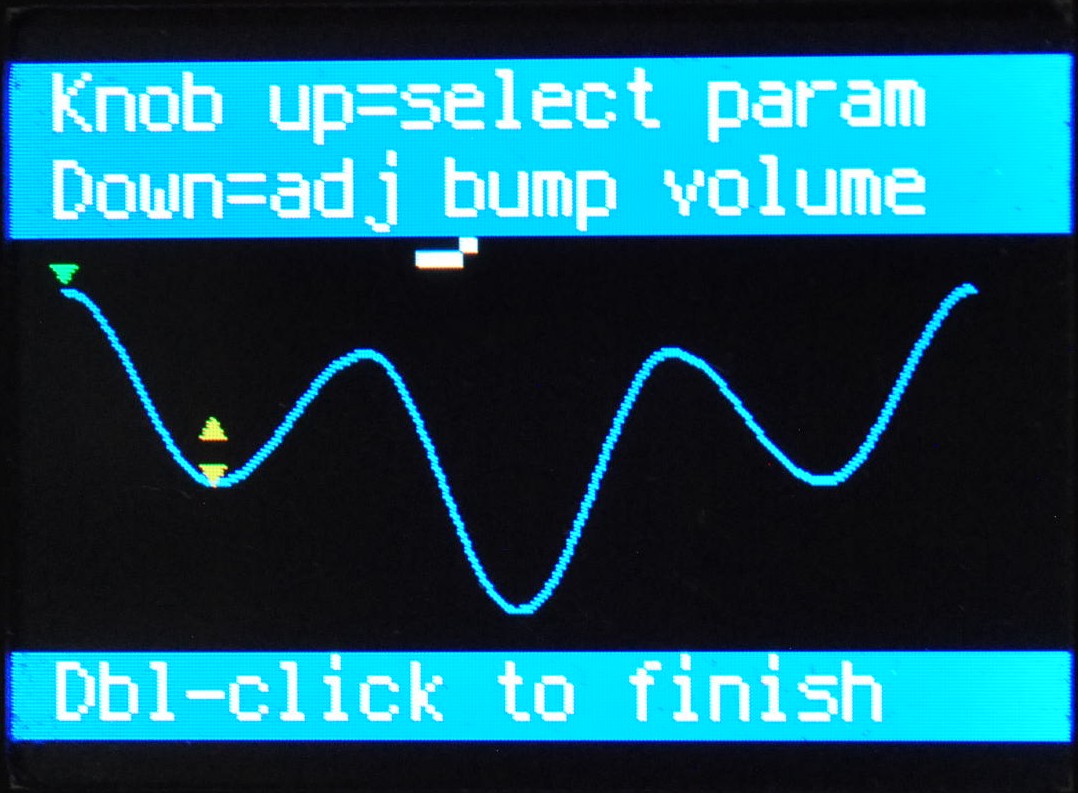
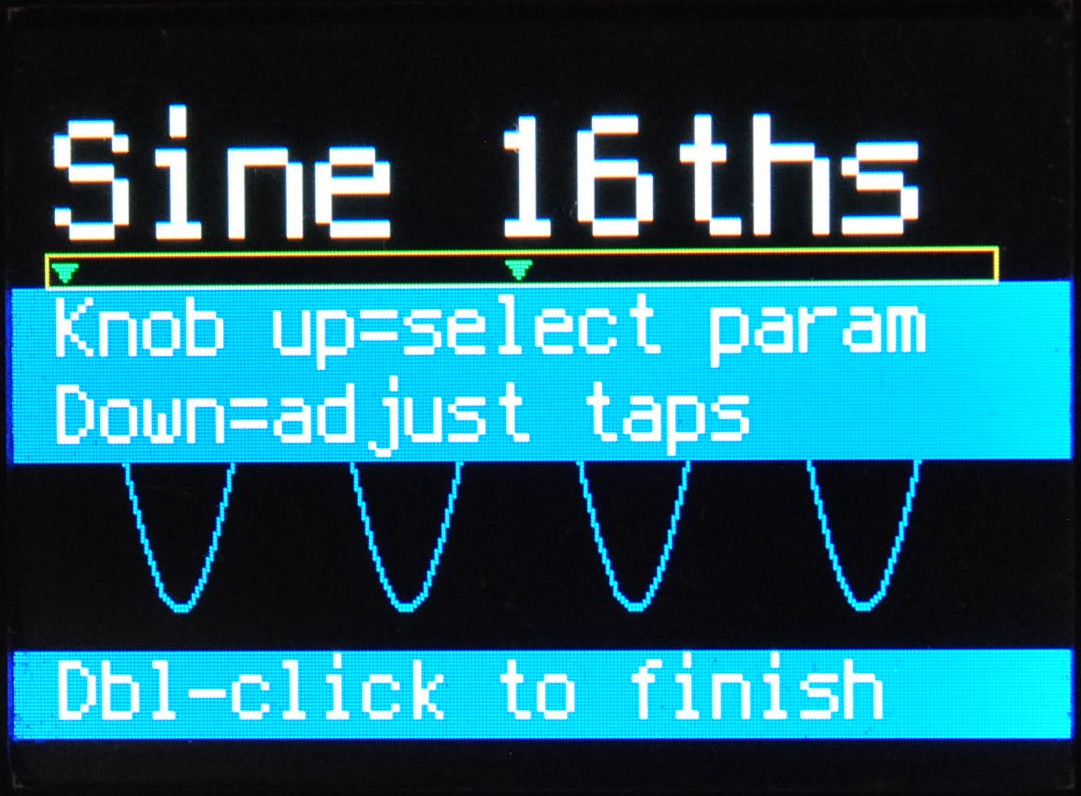
The tap beats are represented by the little green triangles above the waveform on the display.
Each beat corresponds to one of those triangles.
![]()
If you're using the tap footswitch to set tempo, the waveform will start when you make the first tap. If you make another tap before three seconds are up, that will determine the tempo (e.g. if it's exactly one second between the first tap and the second, the tempo will be 60.0 bpm). If the next tap is more than three seconds after the first, the pedal will assume you're trying to align the waveform - after all, nobody plays at 20 bpm, right? This means you can either use the tap footswitch to set the tempo, or just use it occasionally to realign the waveform without changing the tempo.
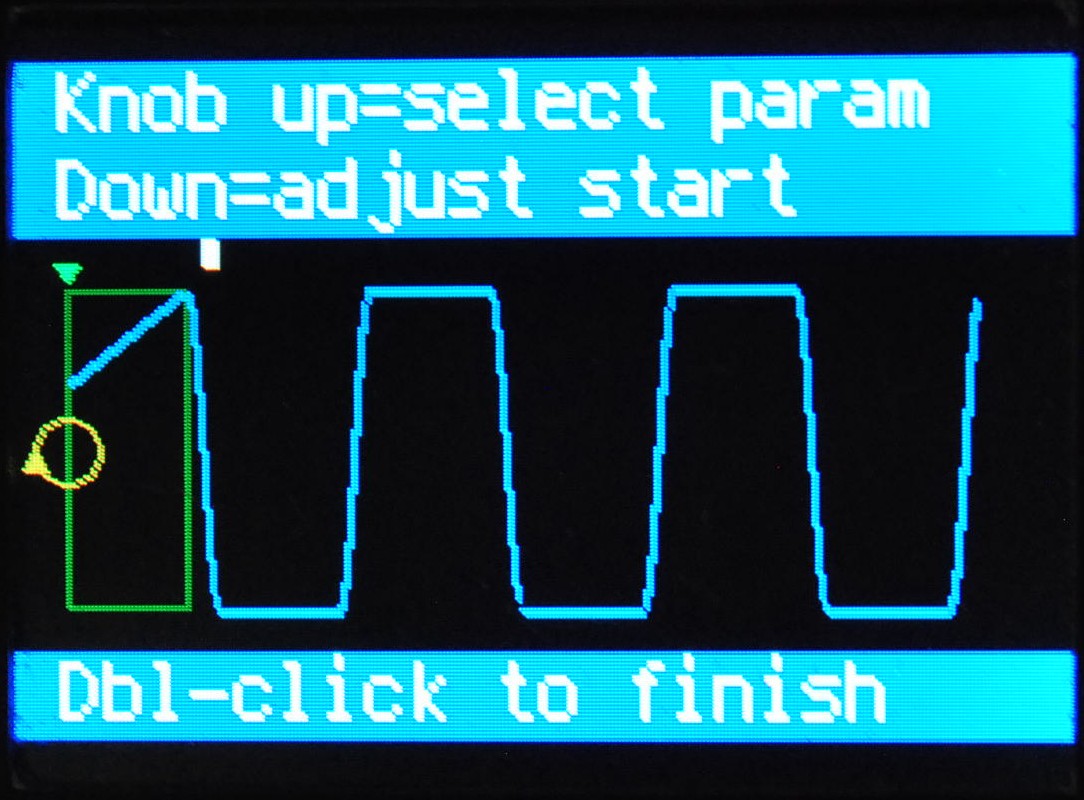
Waveform editing
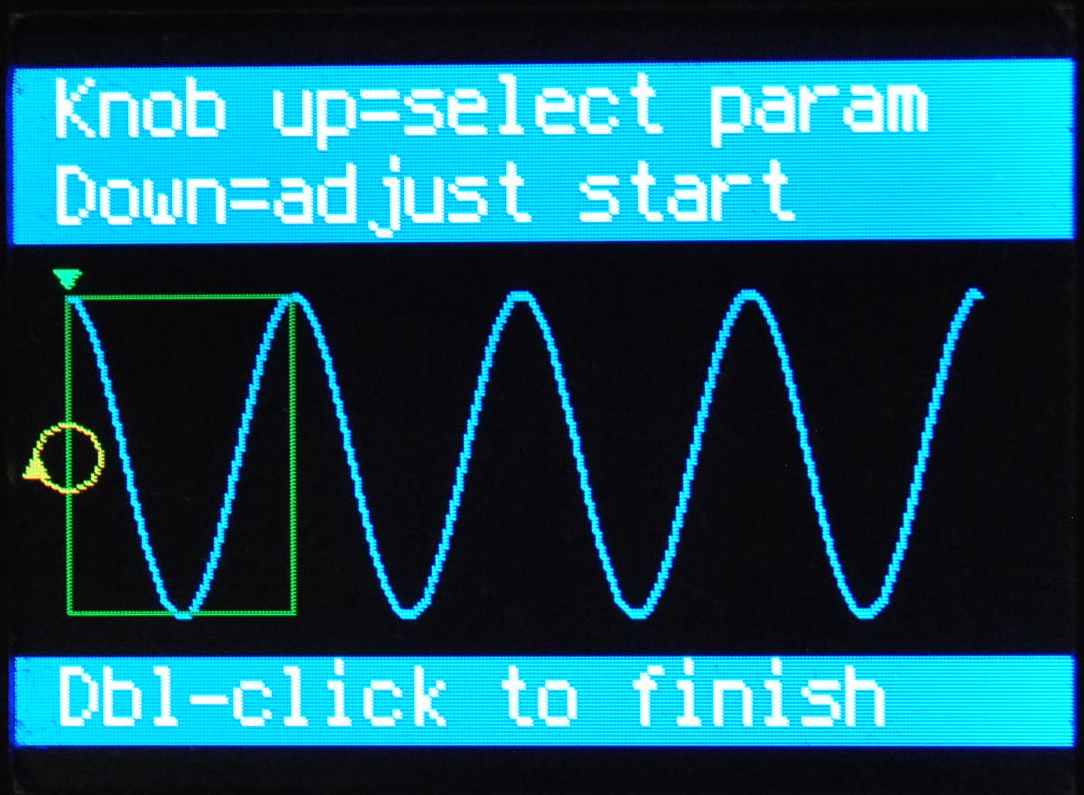
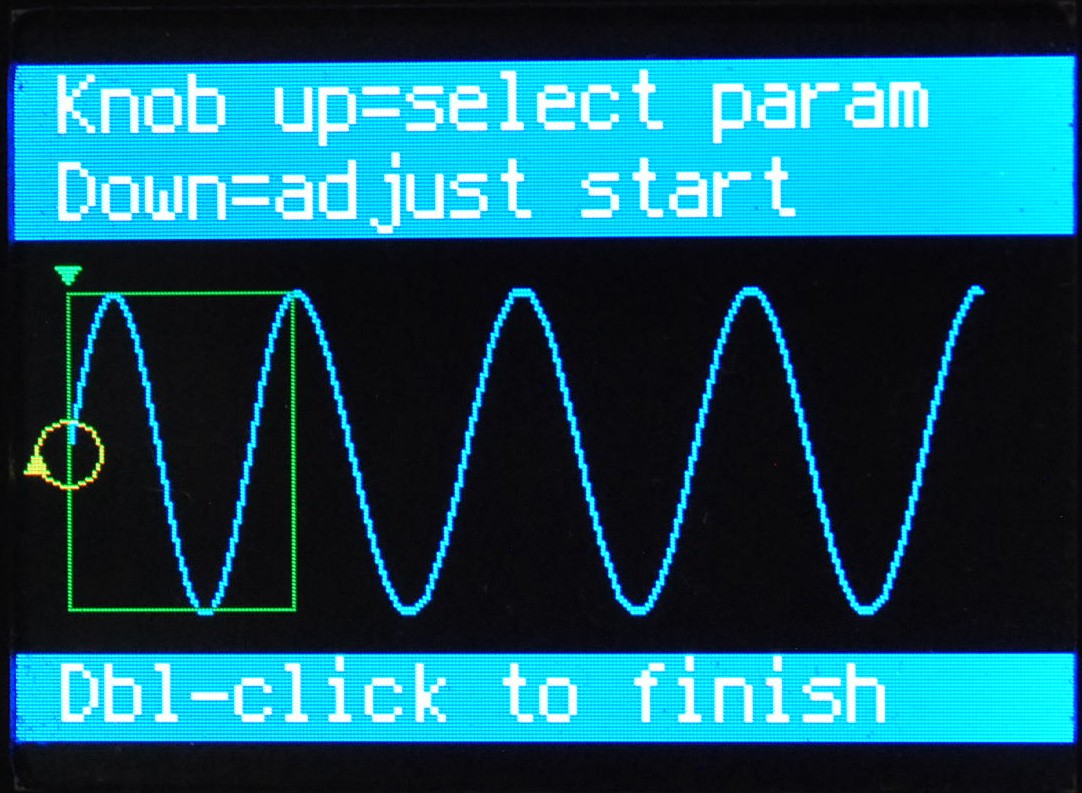
If you want to modify a waveform, press the wave|edit knob down. This flips the pedal into "edit mode".
In edit mode, there are on-screen instructions to guide you.
There are a few key things to remember. Once you've got the hang of these next four points, the rest is pretty easy to work out by just tinkering.
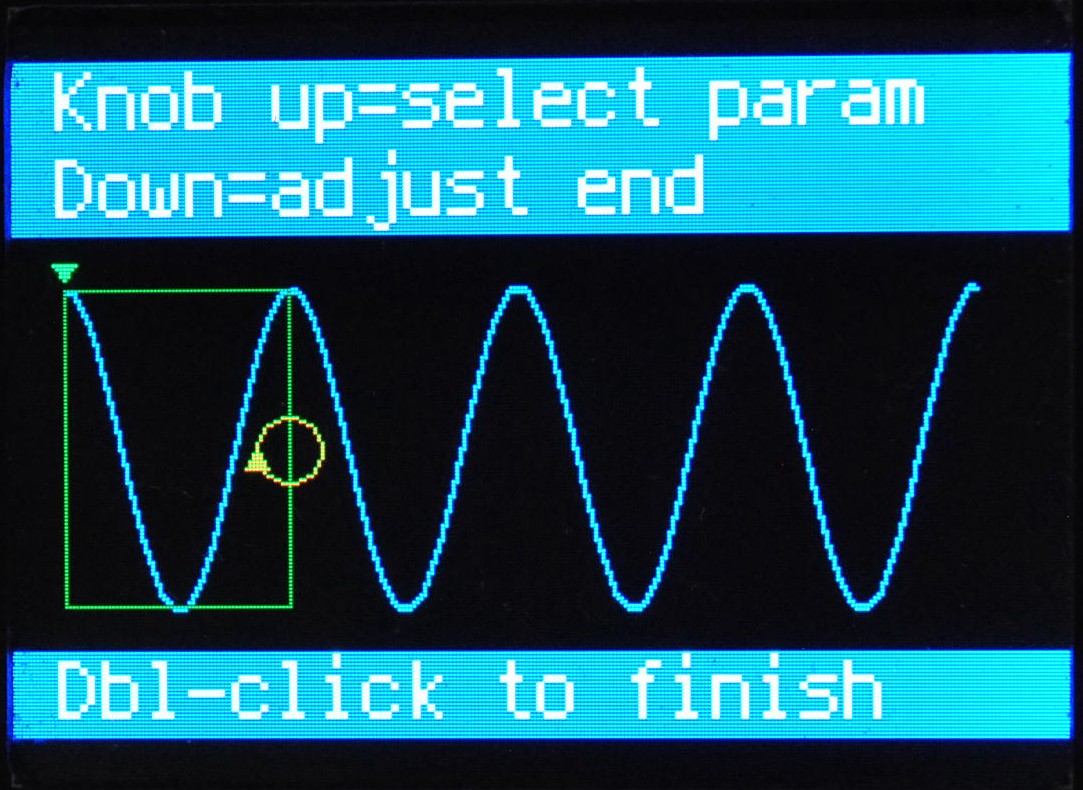
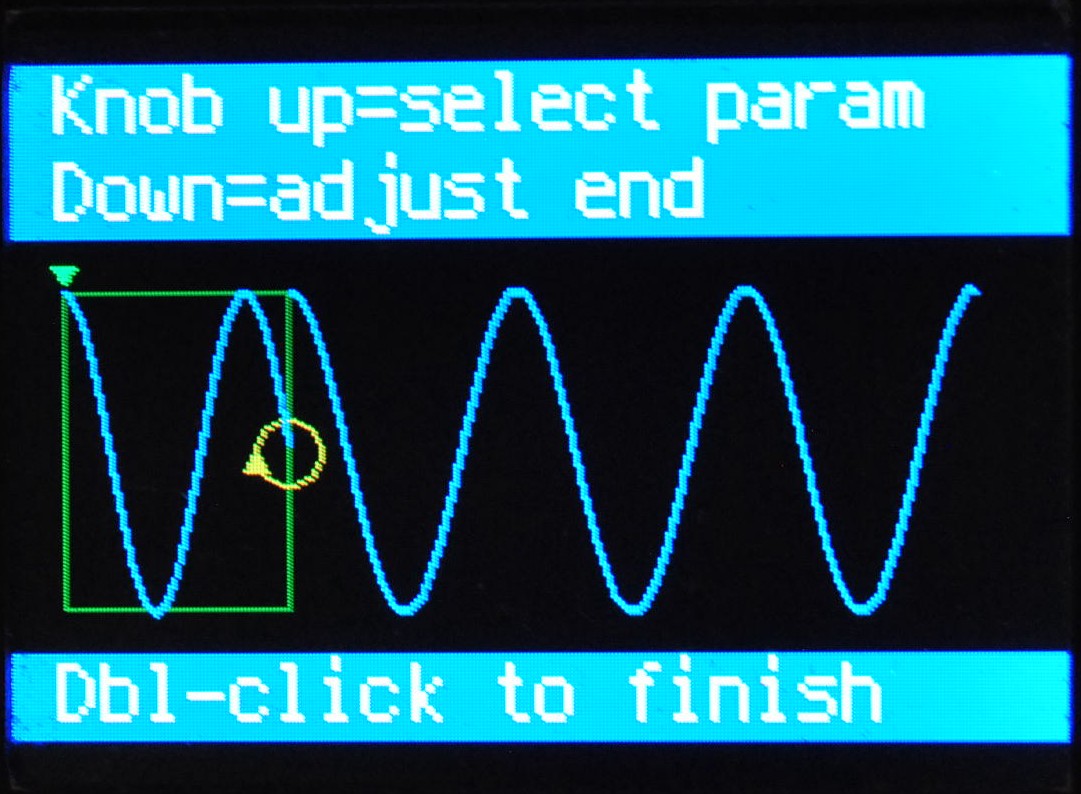
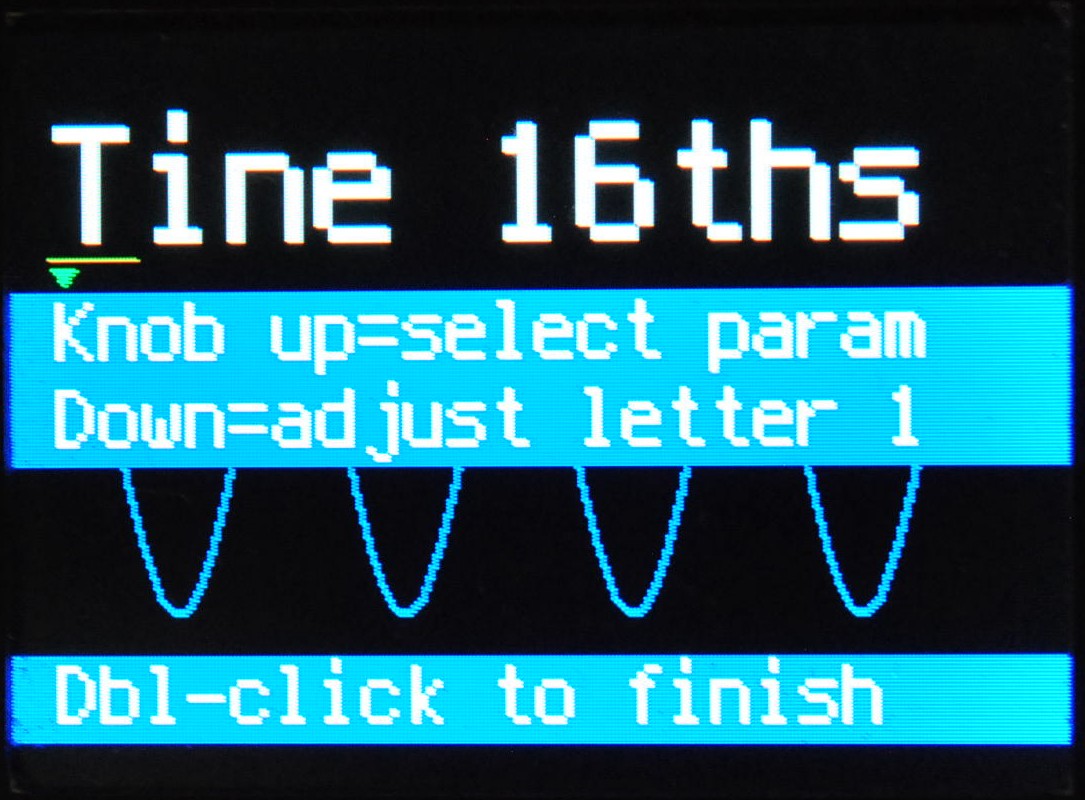
- You can navigate through the parameters by turning the waveform knob. The on-screen help will tell you what the parameter is called.
- You can adjust the current parameter or select an option by pressing and turning the waveform knob at the same time. (On some pedals, press the edit button and turn the knob at the same time.)
-
Double-click the wave|edit knob to exit.
You'll be given options to save or discard changes.
Turn the knob to select the one you need, then click the wave|edit knob again to finish.
- "Save" will save your changes to the pedal's memory and exit edit mode.
- "Discard" will toss away your changes, set the waveform back to how it was before, and exit edit mode.
- "Cancel" leaves you in edit mode without saving changes.
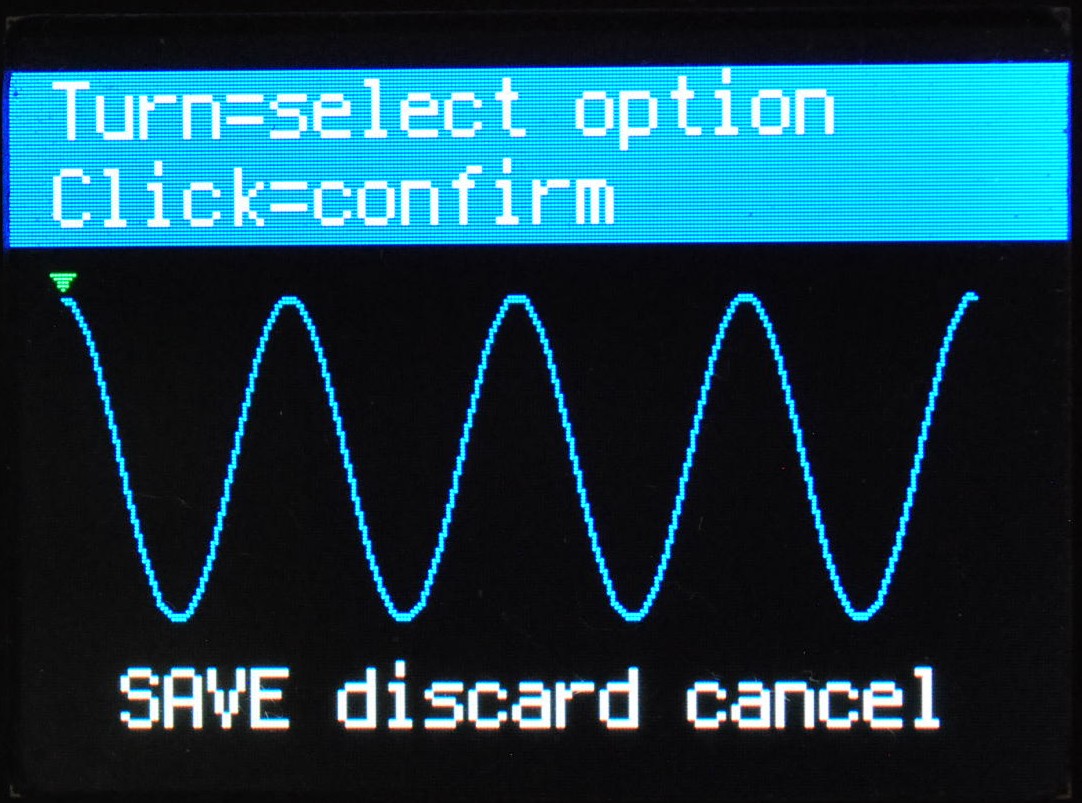
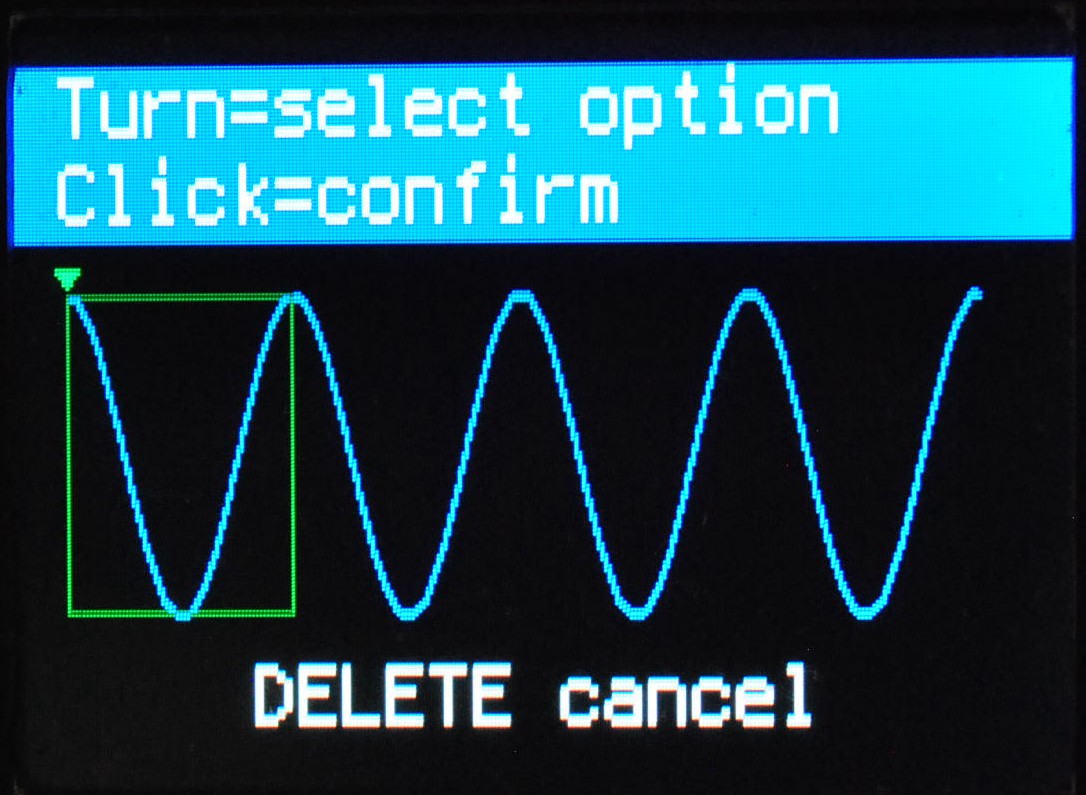
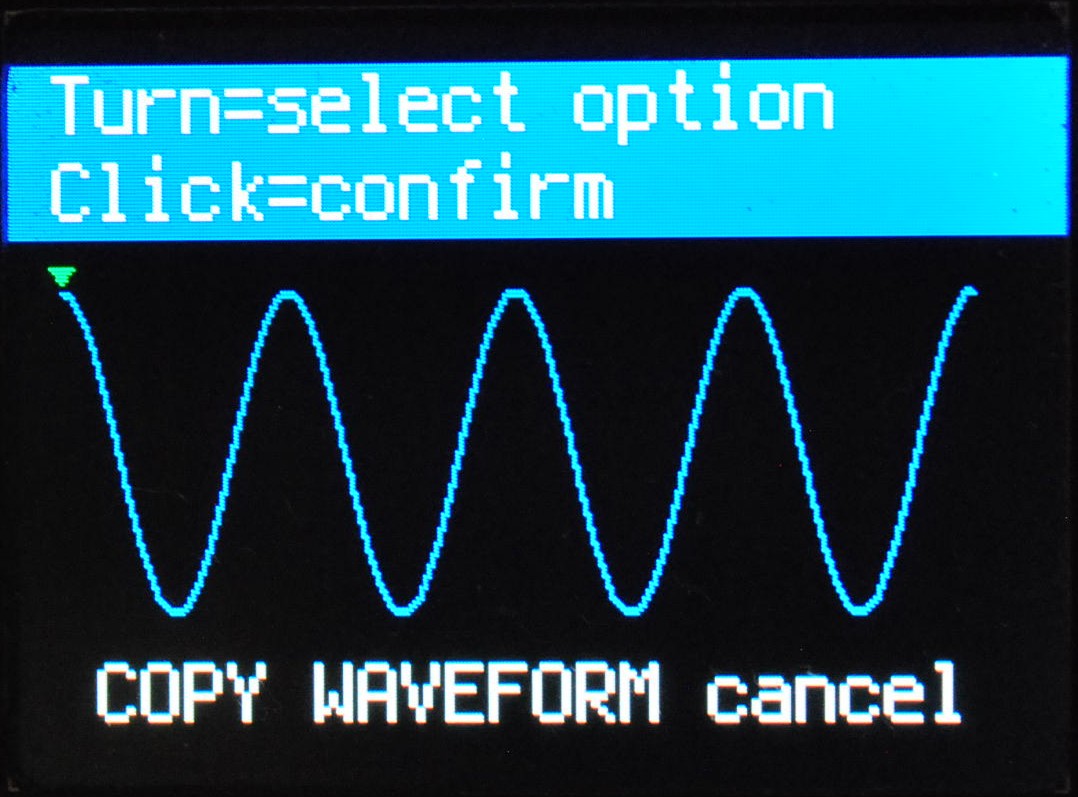
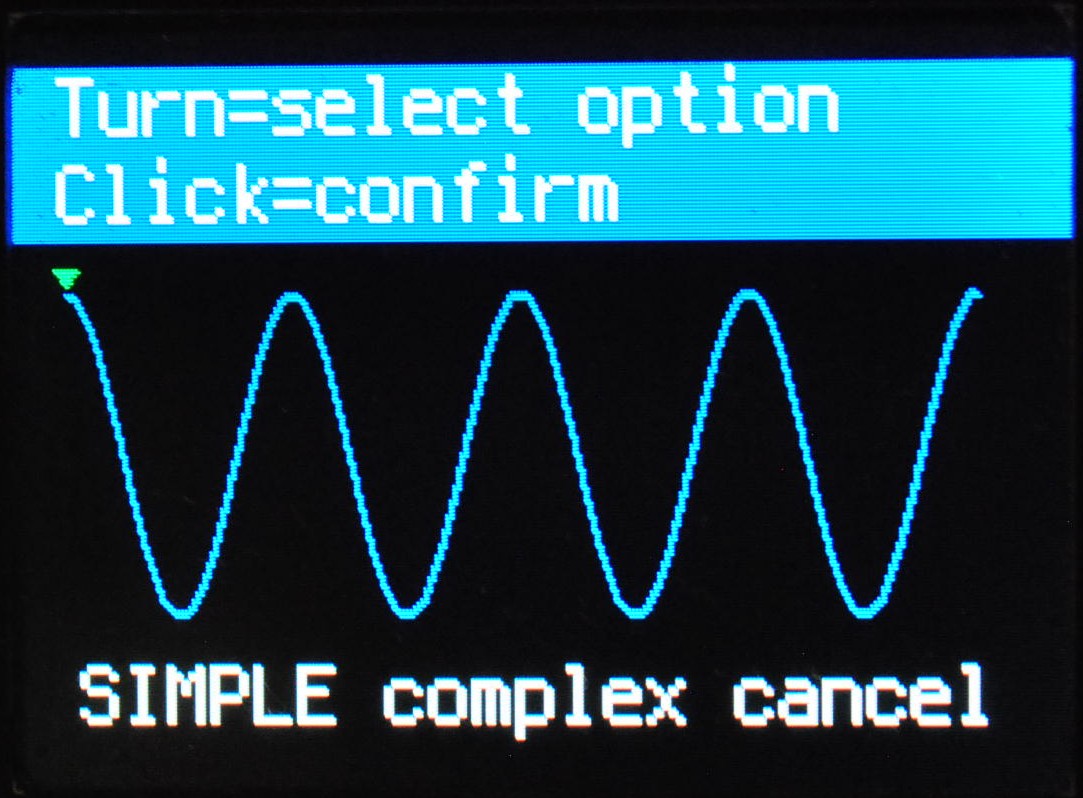
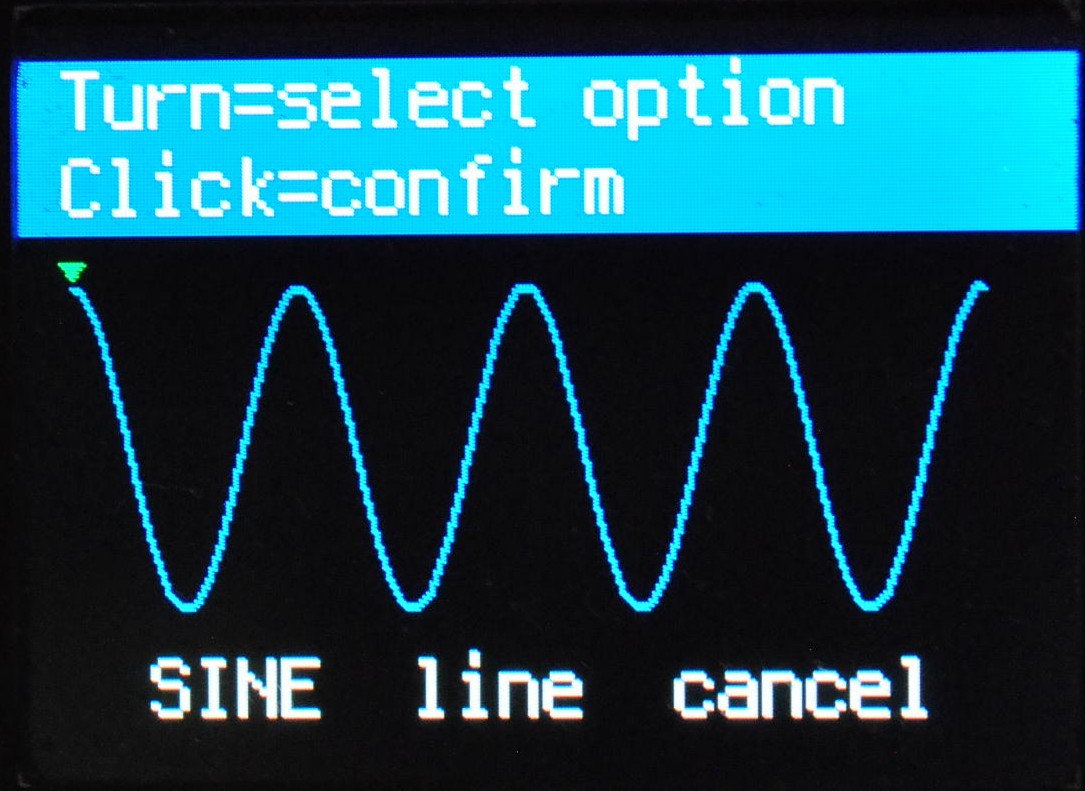
- When options are offered, the selected option is shown in capitals. Turn the waveform knob to select the option you need. Then confirm the selection by clicking the knob down once.
If you want to change a waveform, create a new one or delete the current one, click down the wave|edit knob (or press the edit button, located just above the power jack, if your pedal has one). This flips the pedal into "edit mode".
In edit mode, there are on-screen instructions to guide you.
There are a few key things to remember. Once you've got the hang of these next four points, you may just want to start tinkering.
- You can navigate through the parameters and commands by turning the waveform knob.
- You can adjust the current parameter by pressing the knob down and turning it at the same time, or invoke the current command by pressing the knob down for a moment.
-
Double-click the wave|edit knob (or the edit button) to exit.
You'll be given options to save or discard changes.
Turn the knob to select the one you need, then click the knob again to finish.
- "Save" will save your changes to the pedal's memory and exit edit mode.
- "Discard" will toss away your changes, set the waveform back to how it was before, and exit edit mode.
- "Cancel" leaves you in edit mode without saving changes.
- When options are offered, the selected option is shown in capitals (it's the "SAVE" option in the photo above). Turn the waveform knob to select the option you need. Then confirm the selection by clicking the knob down once.
For detail lovers, here's a deep-dive into how editing works.
You can reach all the adjustable parameters and other commands by turning the waveform knob either way, but they come in a particular general sequence which it helps to understand. Turning the knob clockwise, you'll find the parameters and commands in the order below. If you turn the knob anticlockwise, they'll appear in the opposite order. As the knob is turned, there's on-screen help text and icons to help you understand what's going on.
- Parameters affecting the waveform's shape
- The waveform's name
- Options for deleting, copying and creating new waveforms
- Tap points
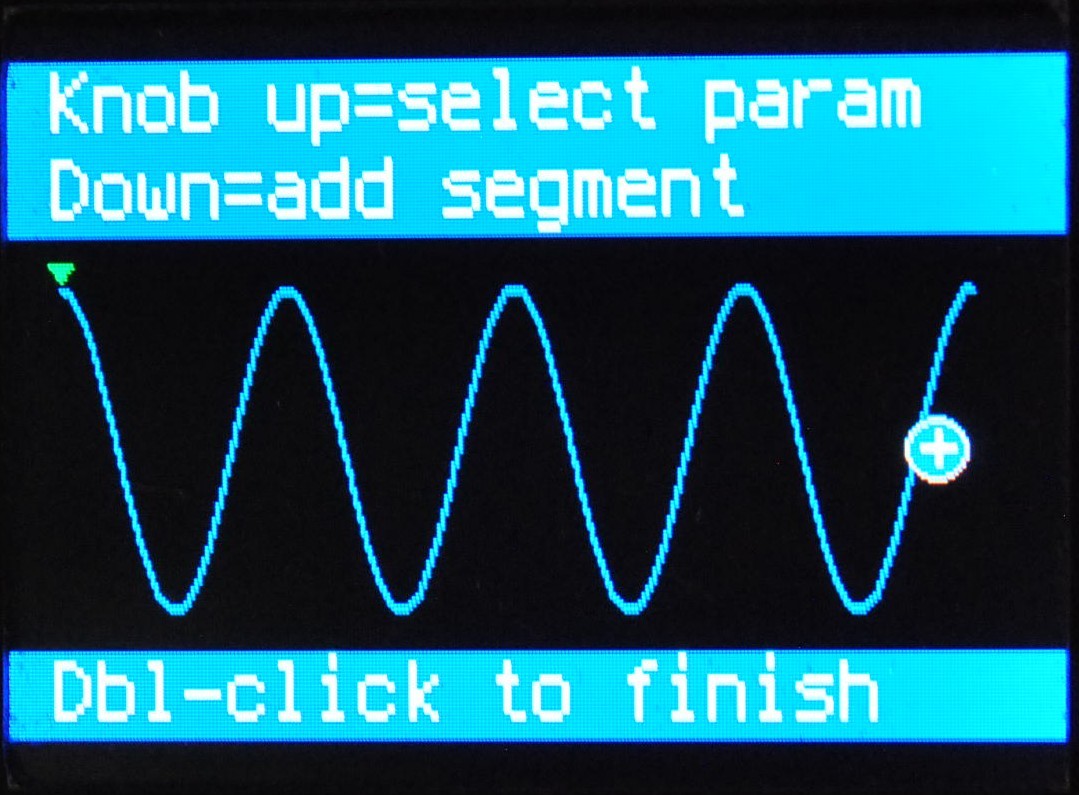
- Add a segment to the current waveform
The wave-shaping parameters you'll see are determined by whether the waveform is "simple" or "complex". Simple waveforms are a series of bumps and troughs of equal duration. Complex waveforms can contain segments which can be either sine waves or straight lines, and the segments can be of varying duration.
For music genres which place the greatest emphasis on the first beat of the bar, waveforms which start loud will probably sound better.
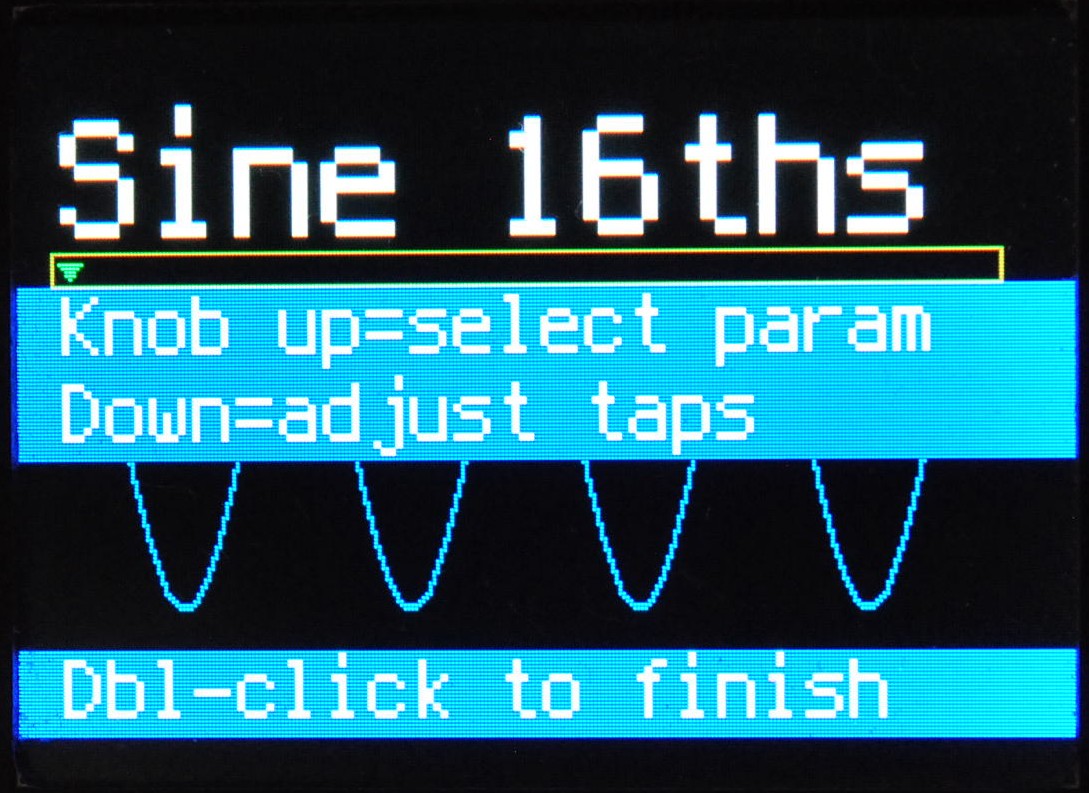
Think about your time signature before you start. Figure out which beats you want to emphasise.
Set the number of beats, shown as green triangles on the display.
![]()
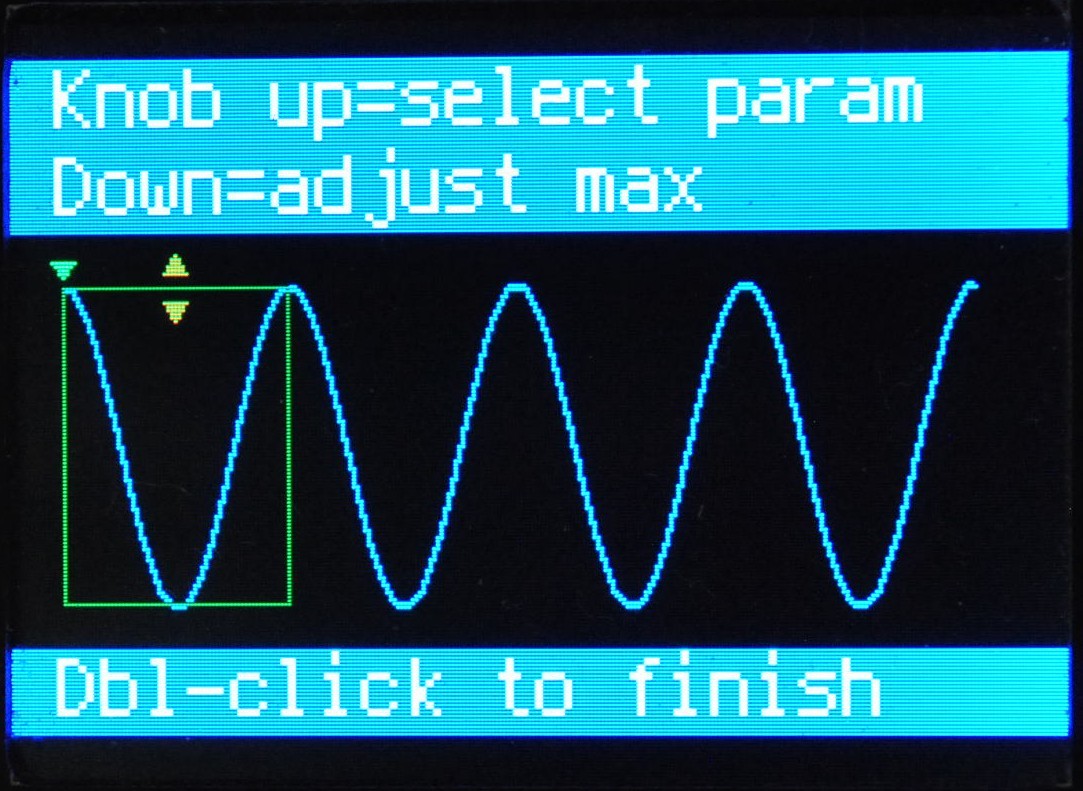
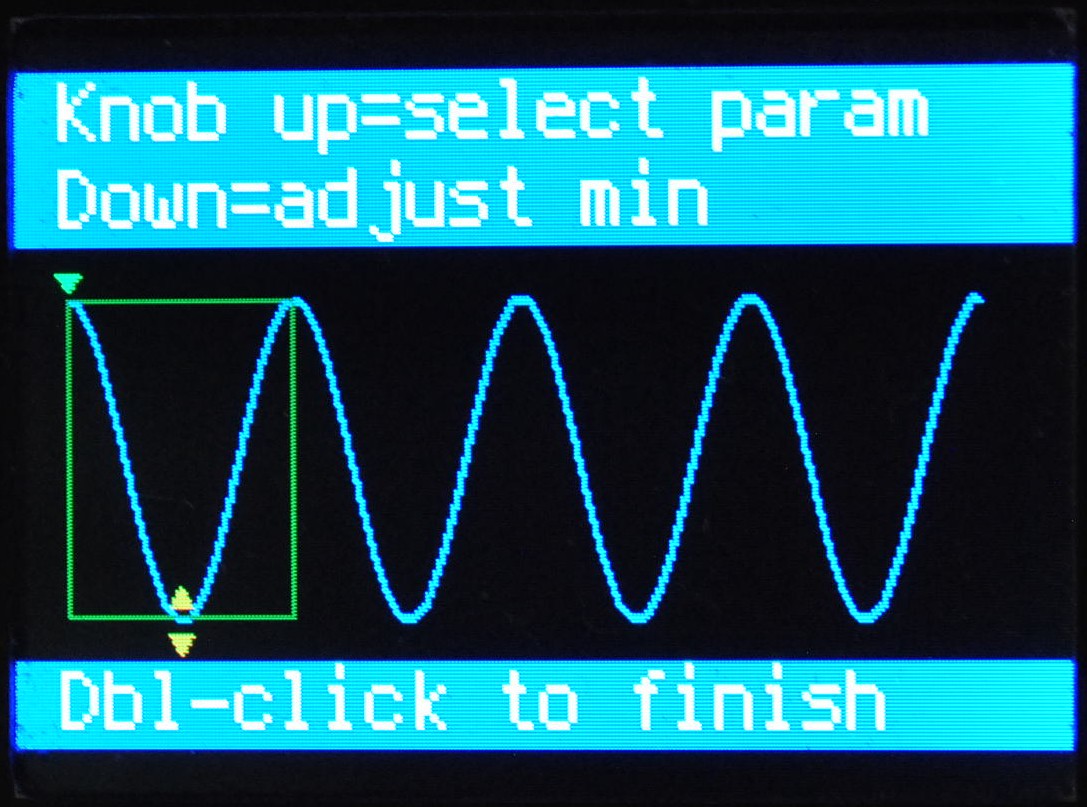
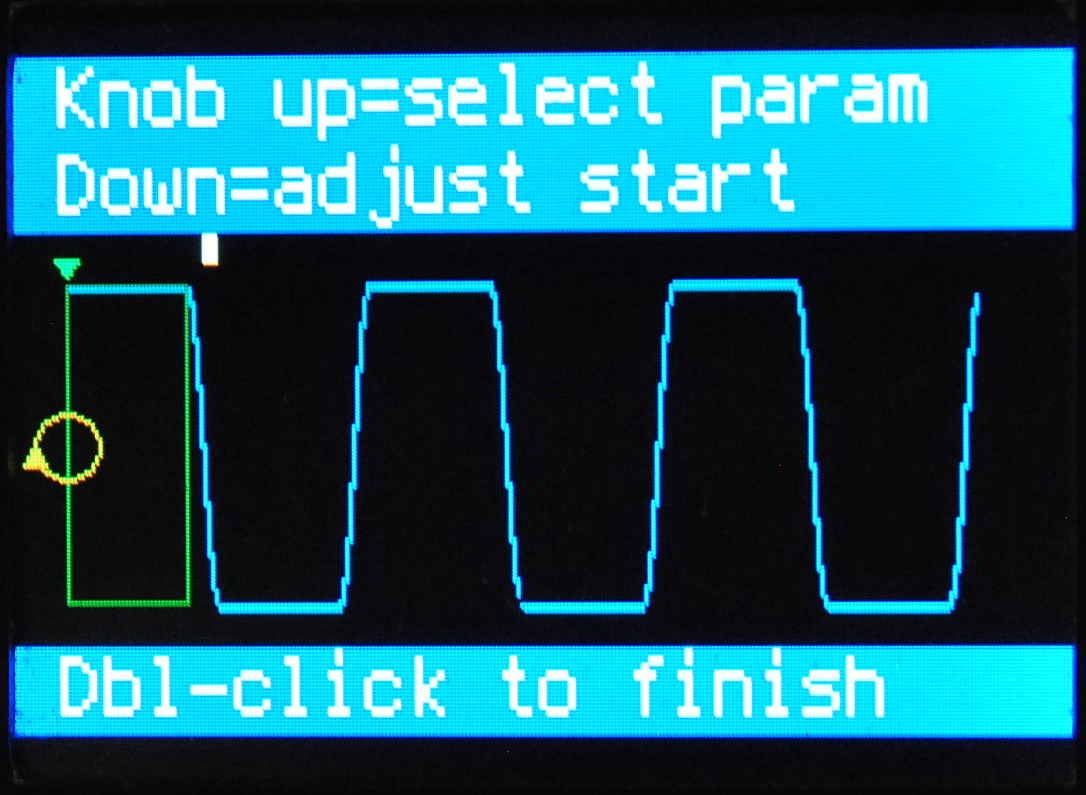
Line up the peak of a sine segment with the beat you want to emphasise. Or start a line segment loud at the point where the beat falls.
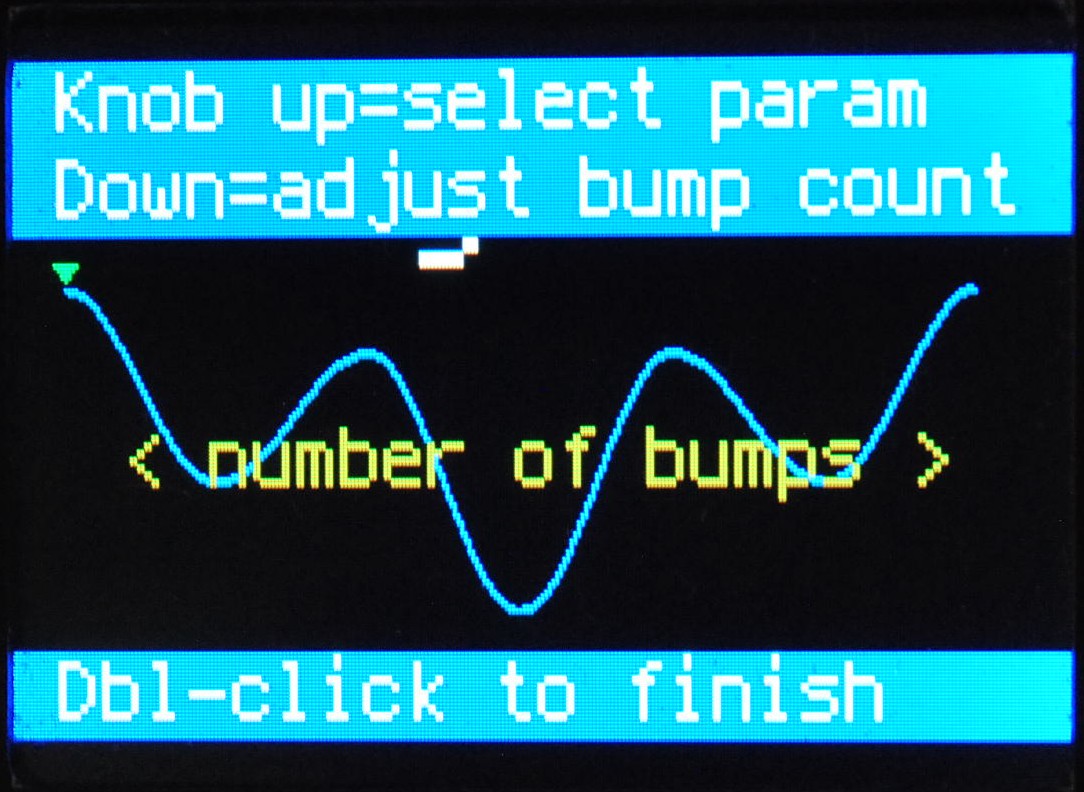
Simple waveforms are all about bumps and troughs. The simplicity is designed to give you quicker results. A simple waveform contains only sine waves which are all the same length.
You can edit a complex waveform so that it becomes a simple one, but you can't edit a simple one to make it complex. This is because the "simple" edit options make sure things stay simple.
| Parameter | Adjusted | Description |
|---|---|---|
 |
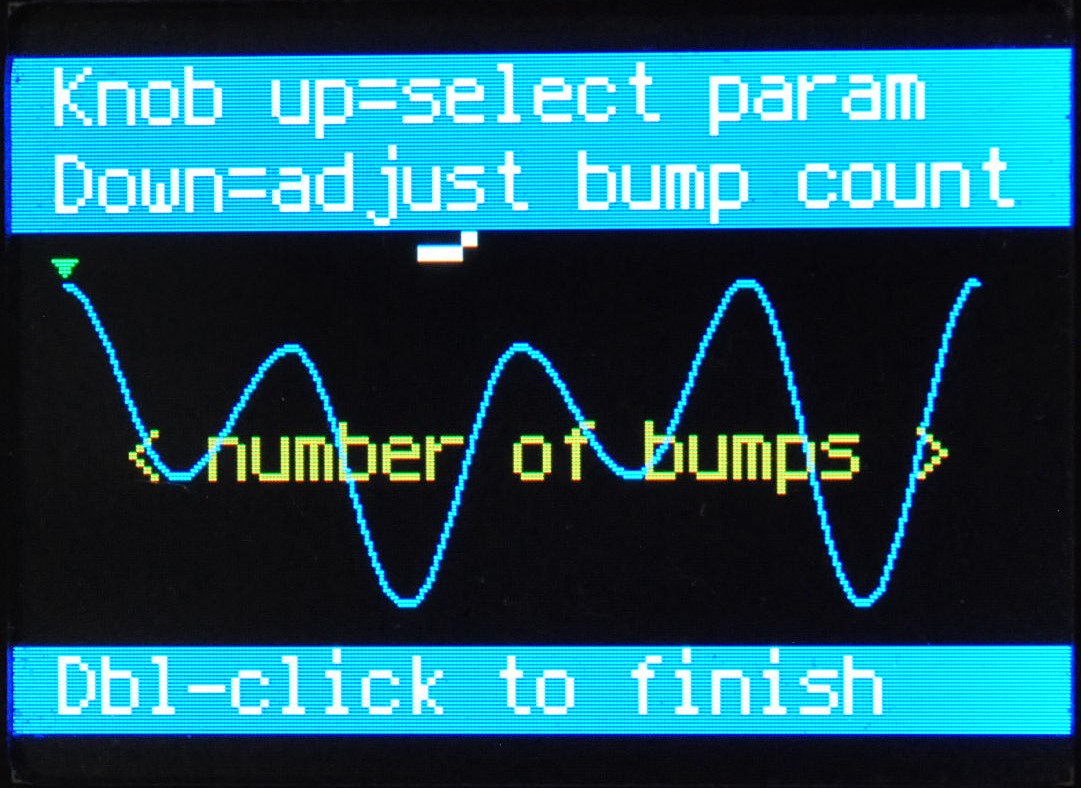 |
Determines the number of bumps and troughs in the waveform. |
 |
 |
Sets the volume of your signal at the peak of the bump. The first bump is a bit special because it joins up with the end of the last bump. |
 |
 |
Apart from that minor difference, the other bumps and troughs work exactly the same way. |
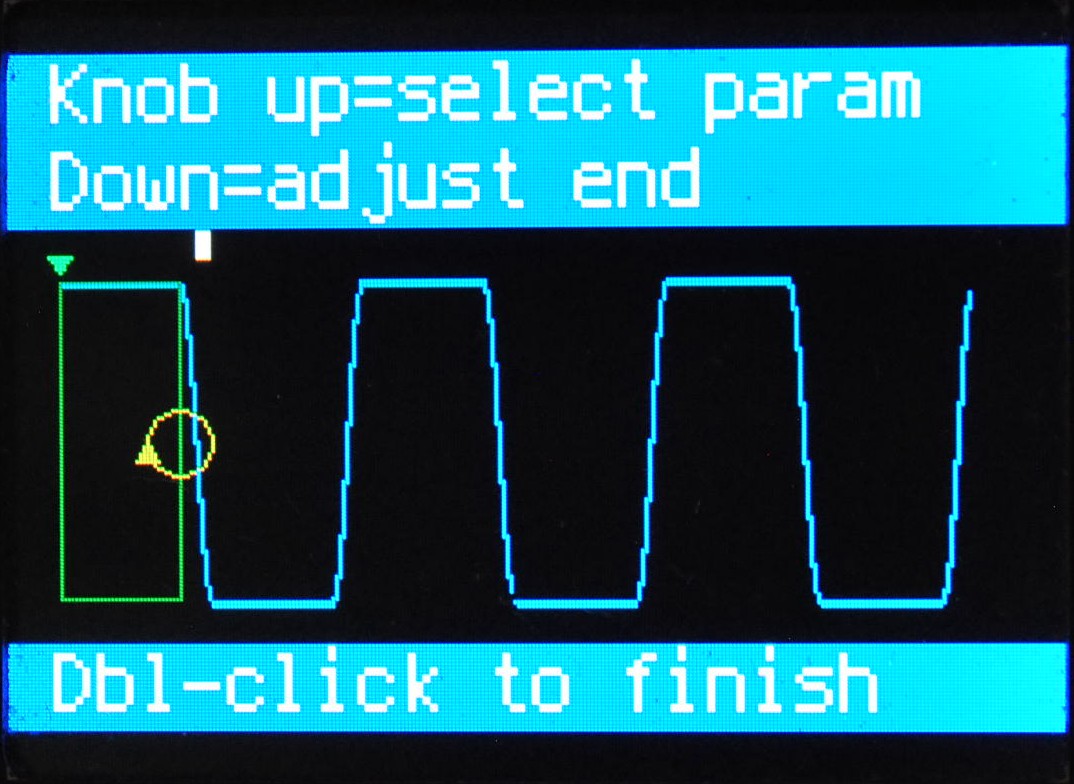
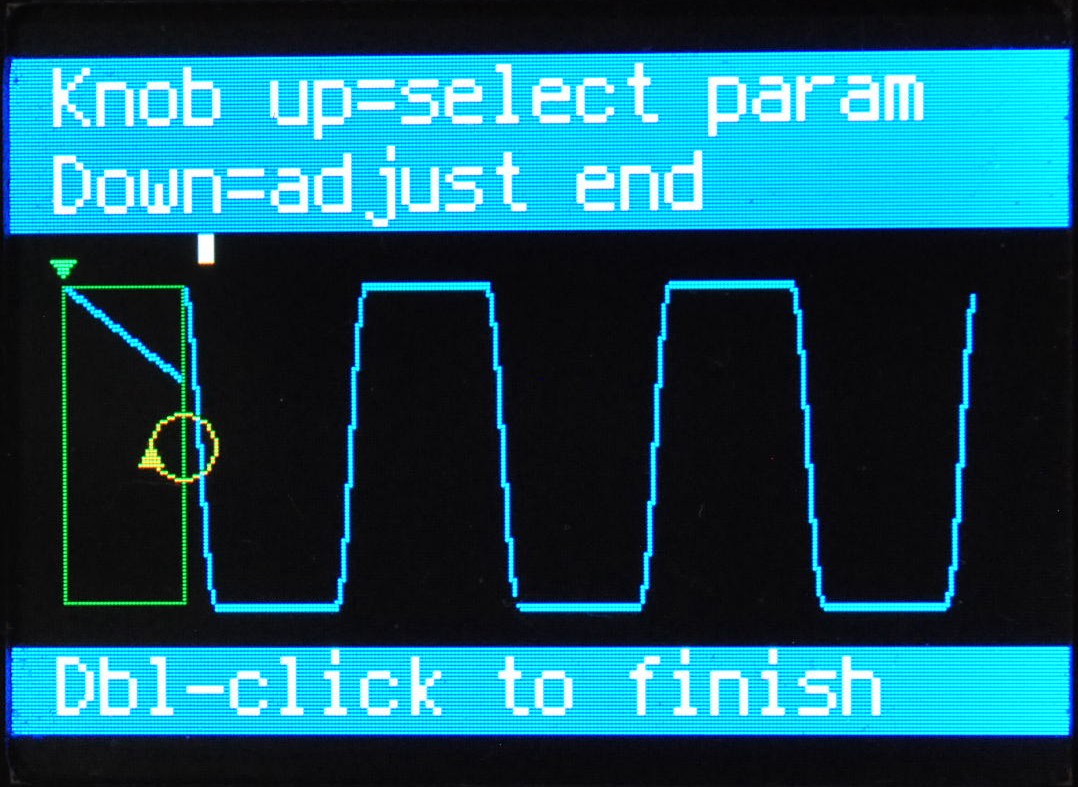
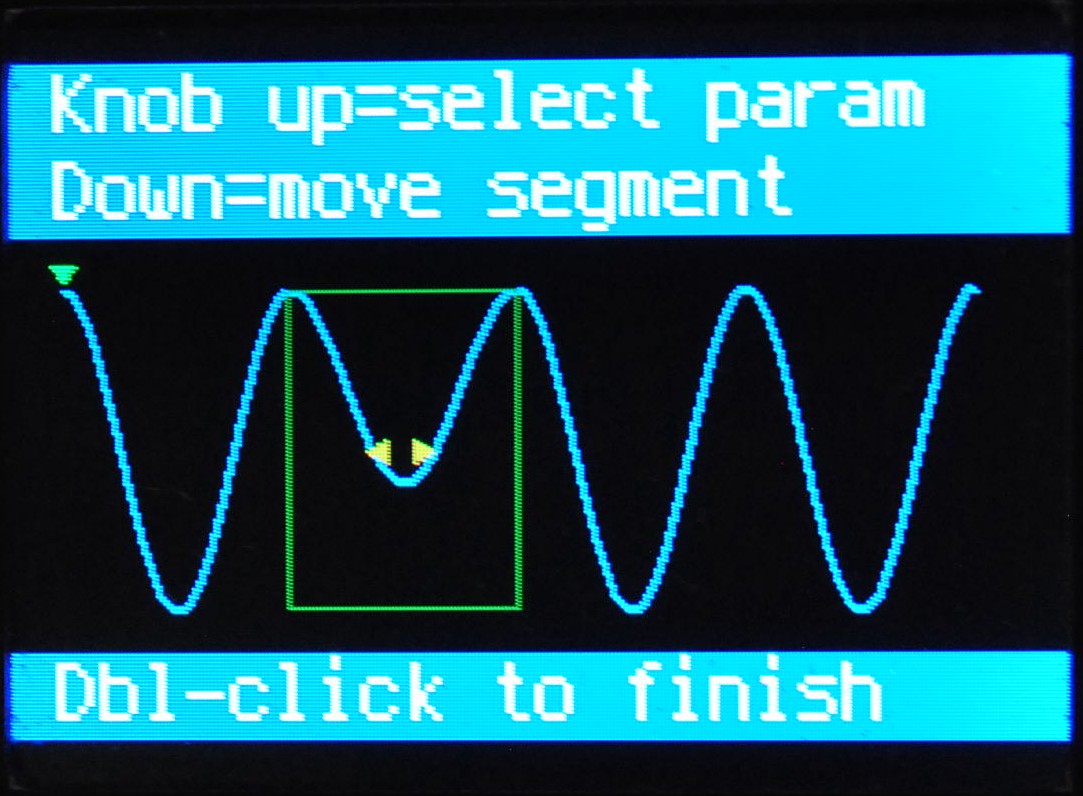
There are many more ways to adjust the segments of a complex waveform than a simple one.
Complex waveforms are built in segments. A segment is either a straight line or a sine wave. Sine segments have different parameters to line segments. You can adjust all of these to get the wave shape you're after.
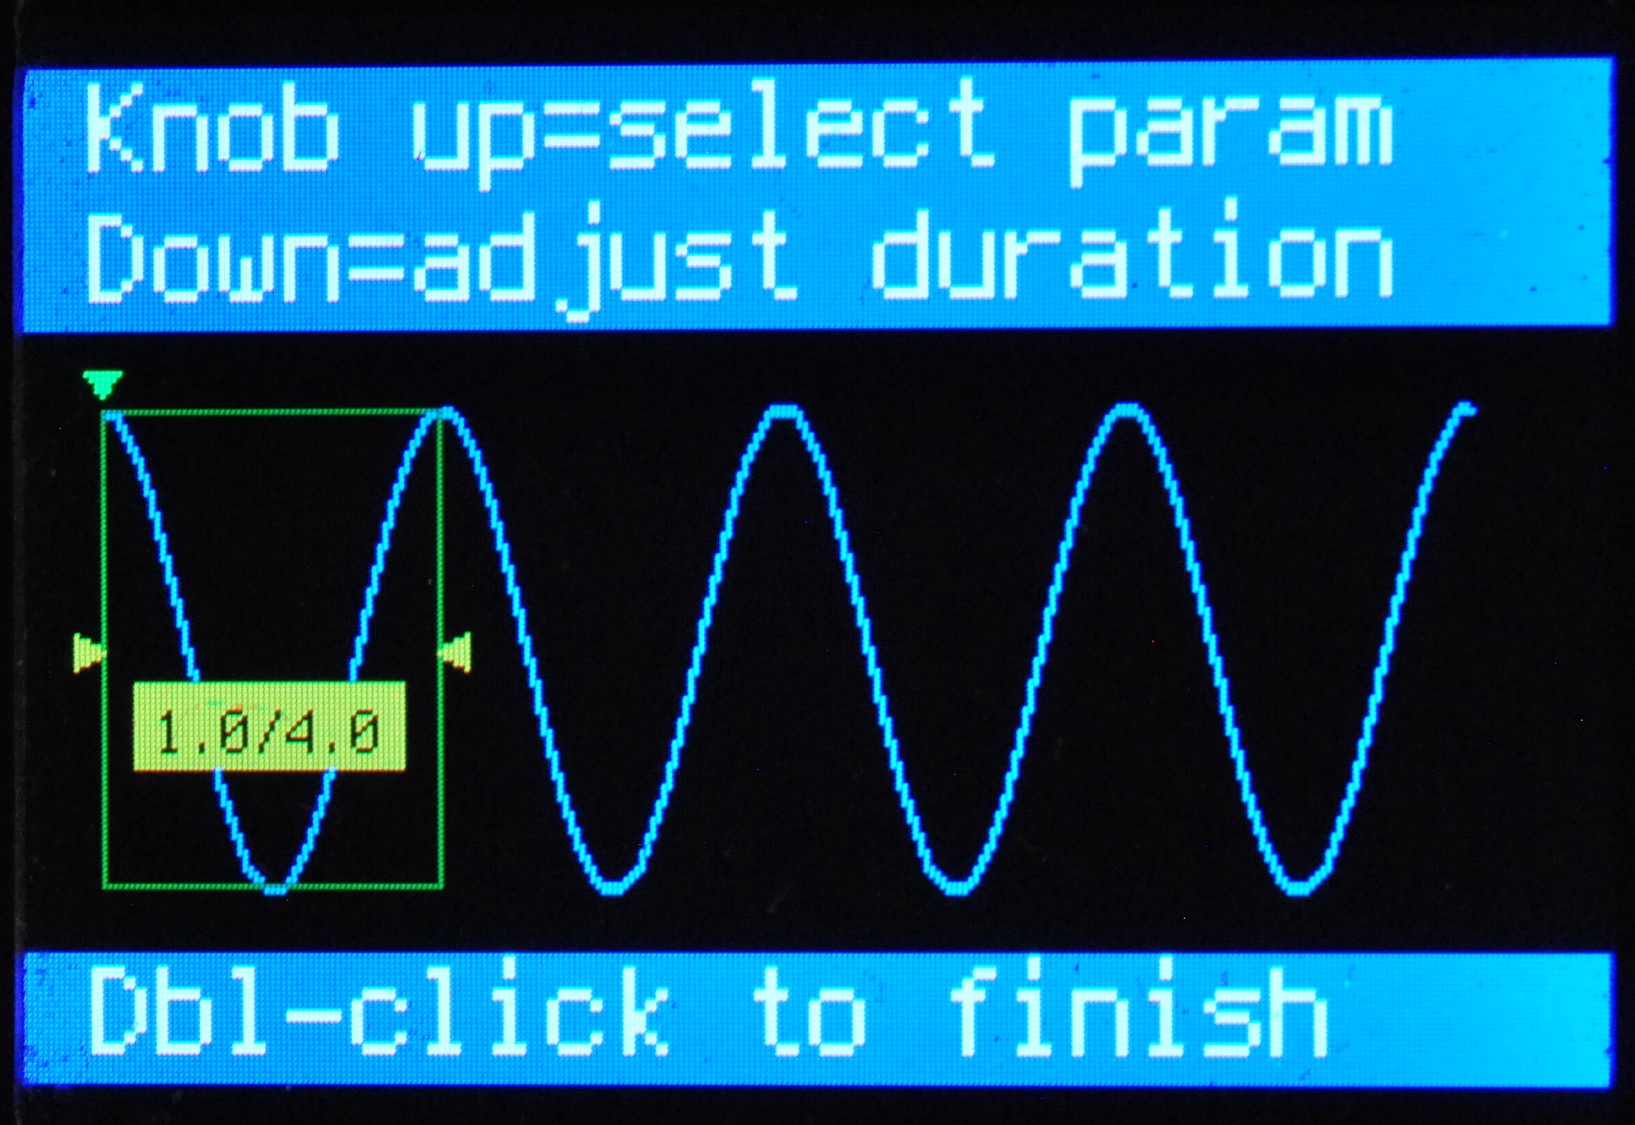
A green rectangle is shown around the segment you're currently editing.
Sine wave segments can go up and down several times, or just once, whereas straight lines are just straight. You can join two or more straight lines together to make triangle waves. You can make a sawtooth waveform using just one line.
You don't need to make the segments meet each other neatly. The software copes fine with sharp transitions.
| The parameter | Adjusting | Segment type | Description |
|---|---|---|---|
 |
 |
Sine and Line | Duration - should really be called "relative duration", but that wouldn't fit on the screen. A segment with a duration of 12.0 will last four times longer than another segment in the same waveform with a duration of 3.0. The duration of a segment is determined by where the tap points are, and what the current BPM is. |
 |
 |
Sine | Alters the angle the sinewave starts at. If maths isn't your thing, just try it out, it's pretty simple once you've seen it on screen. Basically, adjusting this (and the next parameter) changes how many ups and downs there are for this segment. |
 |
 |
Sine | Alters the angle the sinewave ends at. |
 |
 |
Sine | Determines where the tops of the sine wave ripples will be. |
 |
 |
Sine | Determines where the bottom of the sine wave ripples will be. |
 |
 |
Line | Alters the volume at the start of the segment. |
 |
 |
Line | Alters the volume at the end of the segment. |
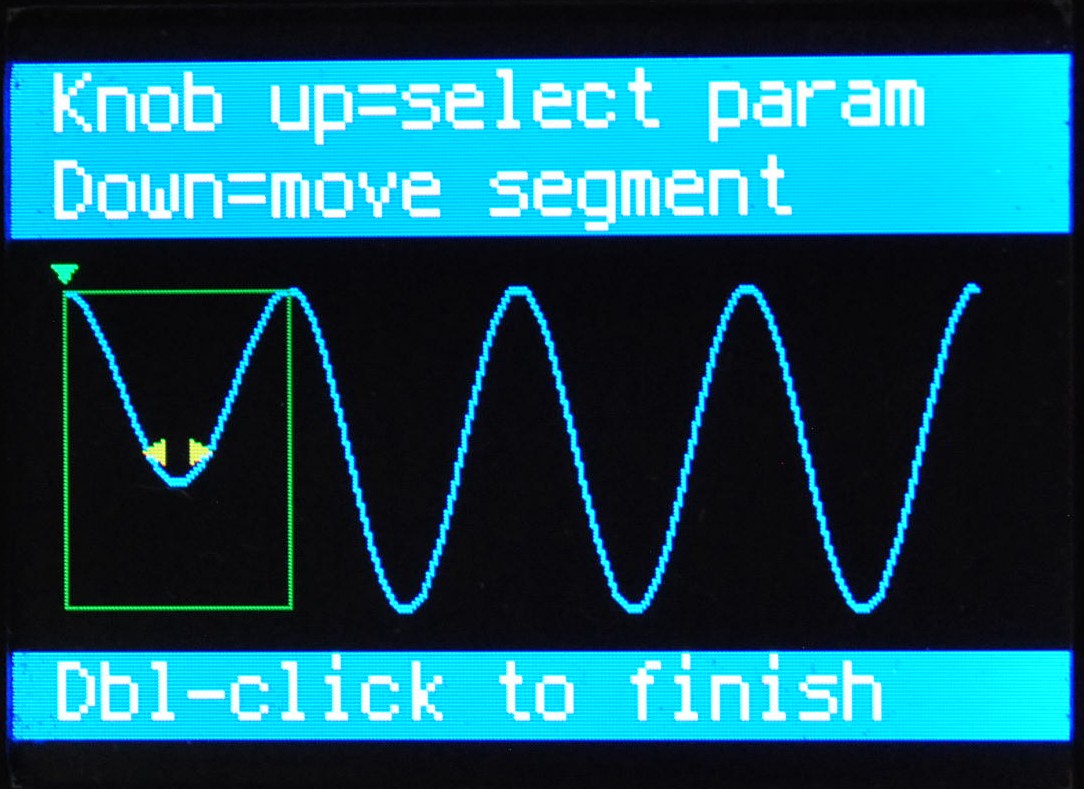 |
 |
Sine and Line | Moves the current segment to a different location within the waveform. This will wrap around at the end, bringing the segment to the start, and vice-versa. |
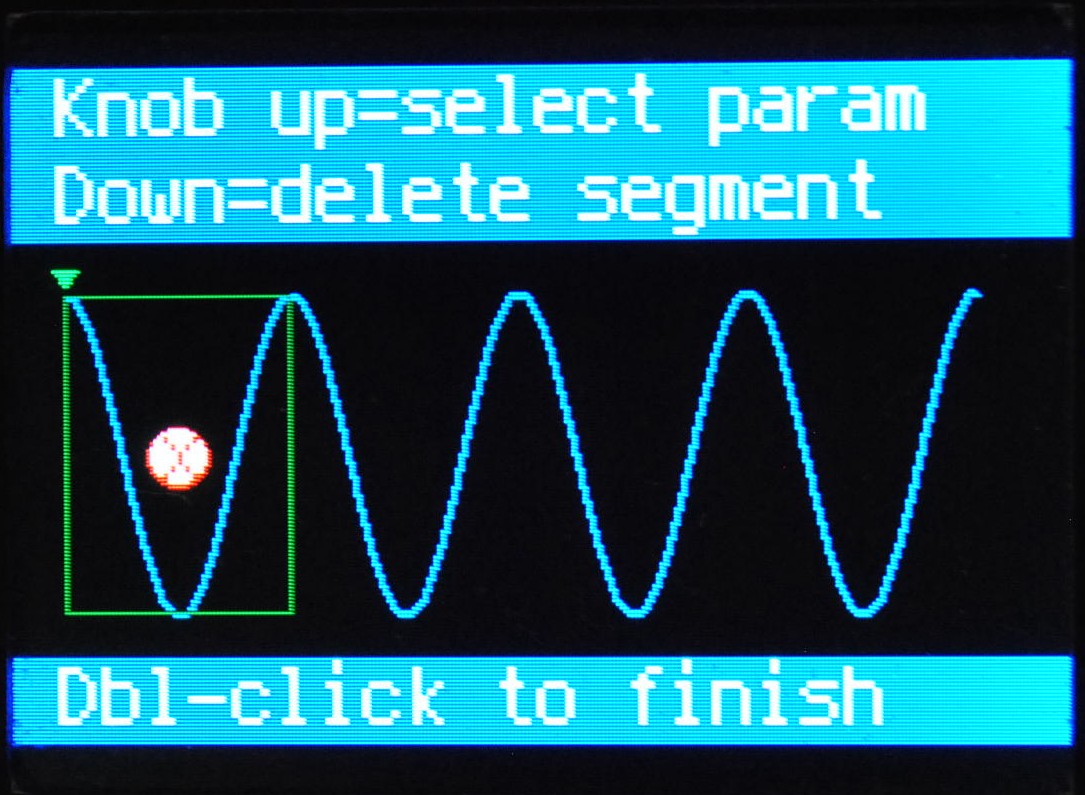 |
 |
Sine and Line | Deletes the current segment from the waveform. A set of options asks you to confirm the action. |
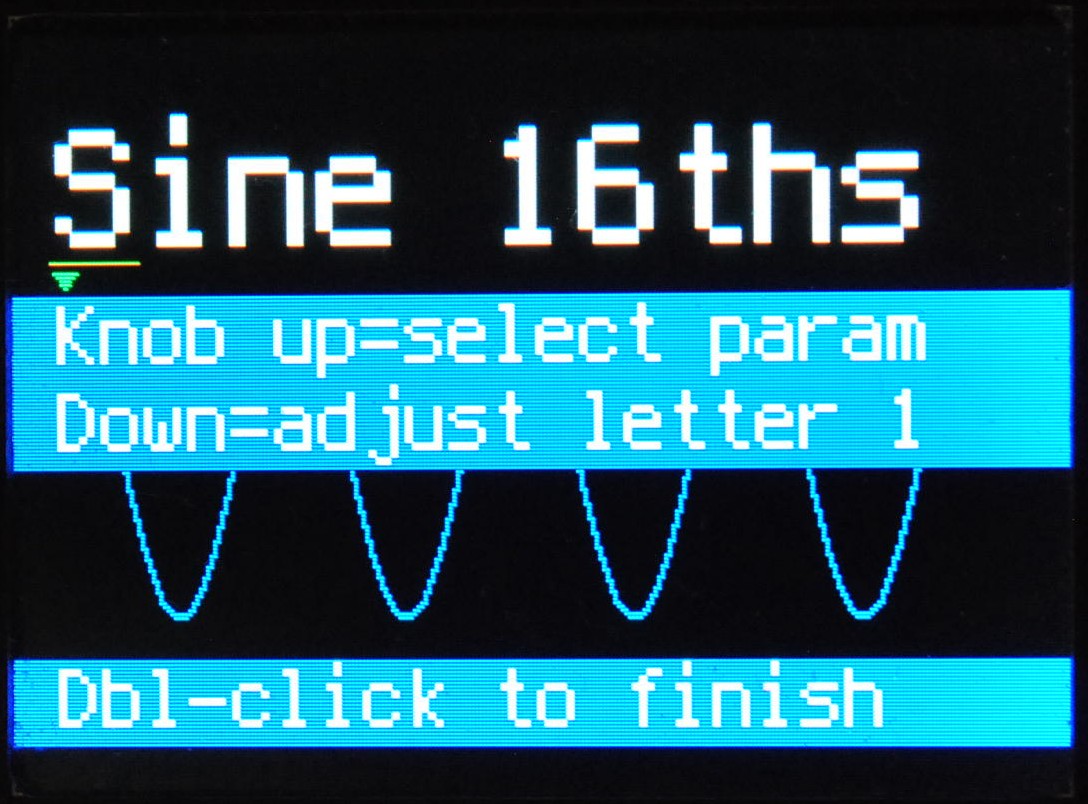
The waveform name can be up to 11 characters long. The knob cycles through the letters, numbers and punctuation available in this order:
ABCDEFGHIJKLMNOPQRSTUVWXYZ
abcdefghijklmnopqrstuvwxyz
[space]0123456789./-,
| The parameter | Adjusting | Description |
|---|---|---|
 |
 |
Allows you to give meaningful (or meaningless - we won't judge) names to your waveforms. |
| The parameter | Adjusting | Description |
|---|---|---|
 |
 |
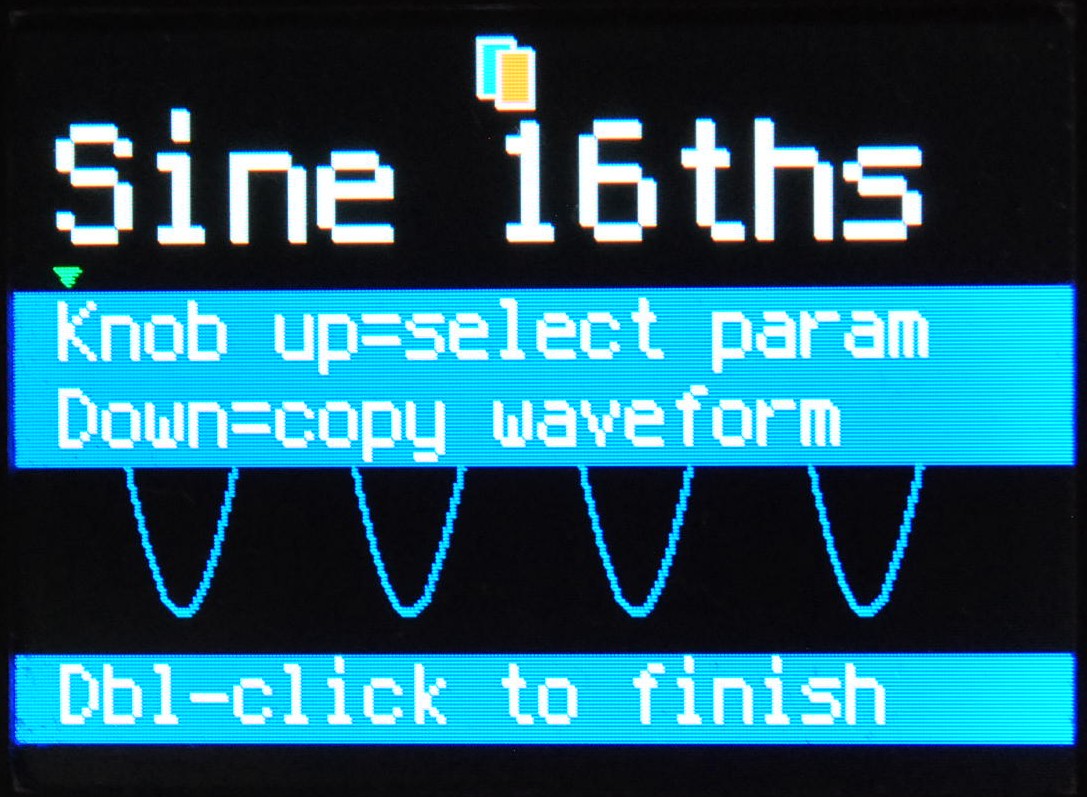
Allows you to copy the current waveform, in its current state, to create a new waveform. This can be handy if you want to A-B your changes. Options ask you to confirm. |
 |
 |
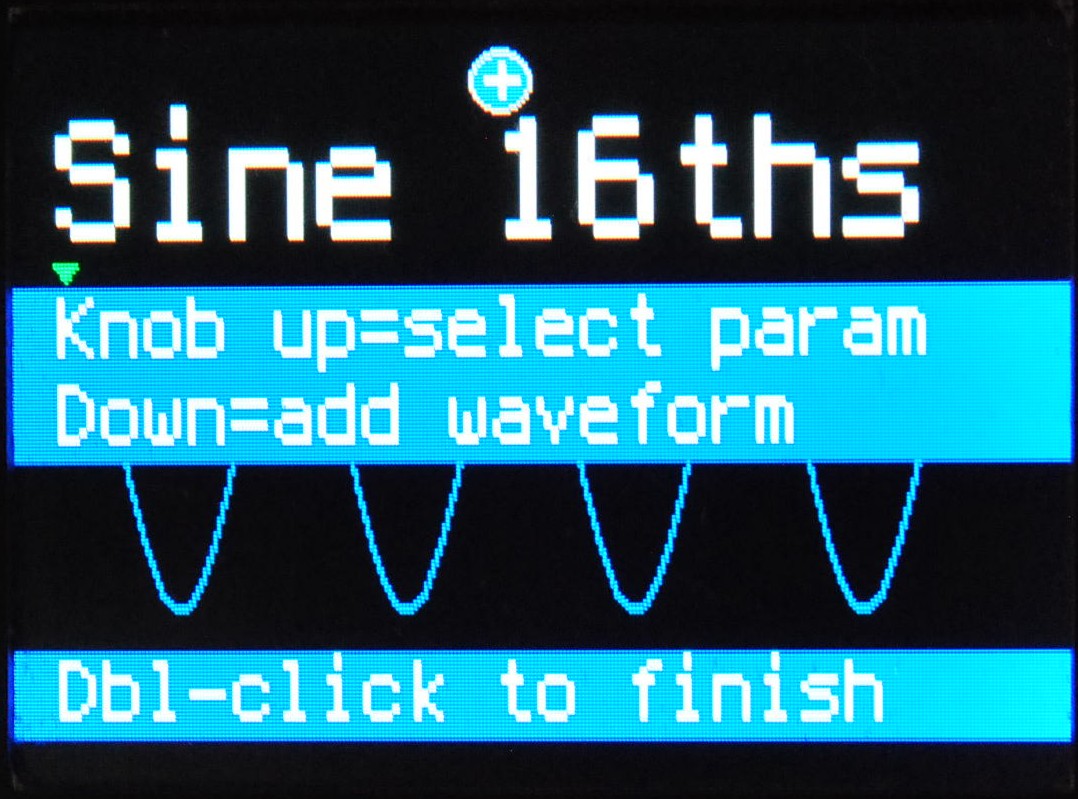
Allows you to create a new waveform. Options ask if you'd like the new waveform to be simple or complex. |
 |
 |
Sets the number of tap points for the waveform. |
 |
 |
Add a new sine or line segment to the current waveform. It'll be added at the end, so you may want to move it. |
If you still can't figure out how to get what you're after, please get in touch. We're still learning how best to make this work for our customers, and there's no such thing as a stupid question.
As new features are developed (and bugs are fixed) for the Zebra-Trem, we post the latest software here.
Latest version
Click here to download the latest software for Zebra-Trem - version 1.11.0
TL;DR
If your current software version is currently 1.5 or earlier (the software version is displayed on power-up), please get in touch before updating the software: we'll need to help you a little with the upgrade process.
If your current software version is 1.10 or earlier, please read about upgrading to v1.11.
Otherwise, just copy the content of the zip file onto your pedal.
Step-by-step instructions
Depending on your machine's configuration, you might need Administrator priviledges to perform these steps.
- Power up the pedal. Be sure NOT to hold down the tap button while it's powering up. Wait for all the messages about copyright, backups, etc. to clear, and for the current waveform to appear.
- Connect the pedal to your PC using a USB data cable.
- Click the link above to download the distribution file. It'll have a name like zebra-trem-v{something}.zip.
- When the download has completed, find the .zip file in your Downloads folder, and double-click it.
-
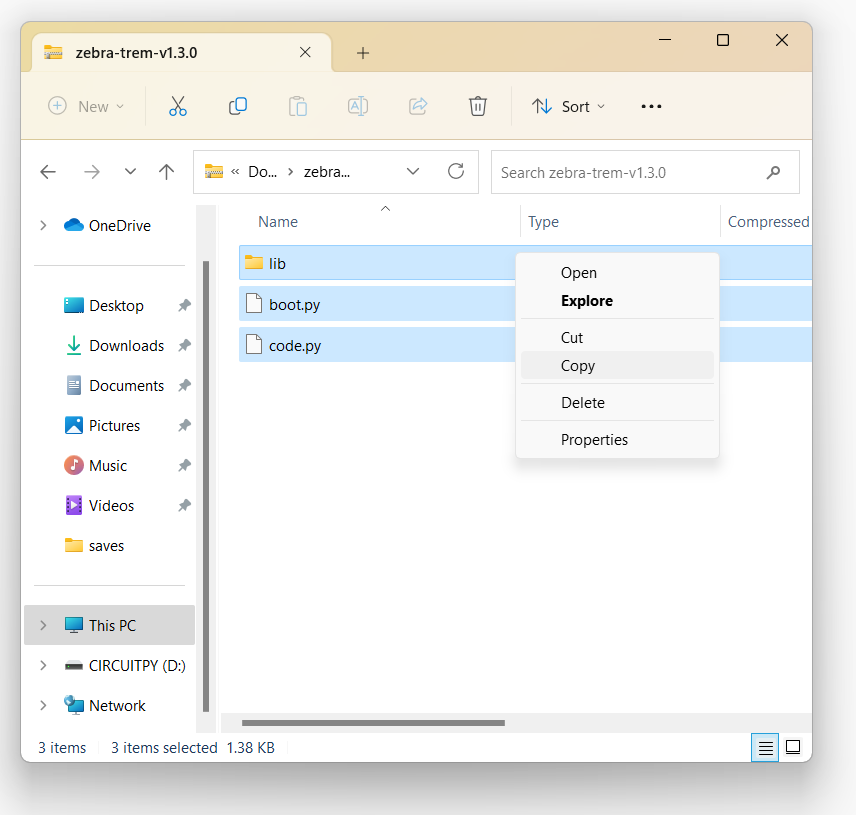
Select all the files and folders, right-click and copy them.
It should look something like this.
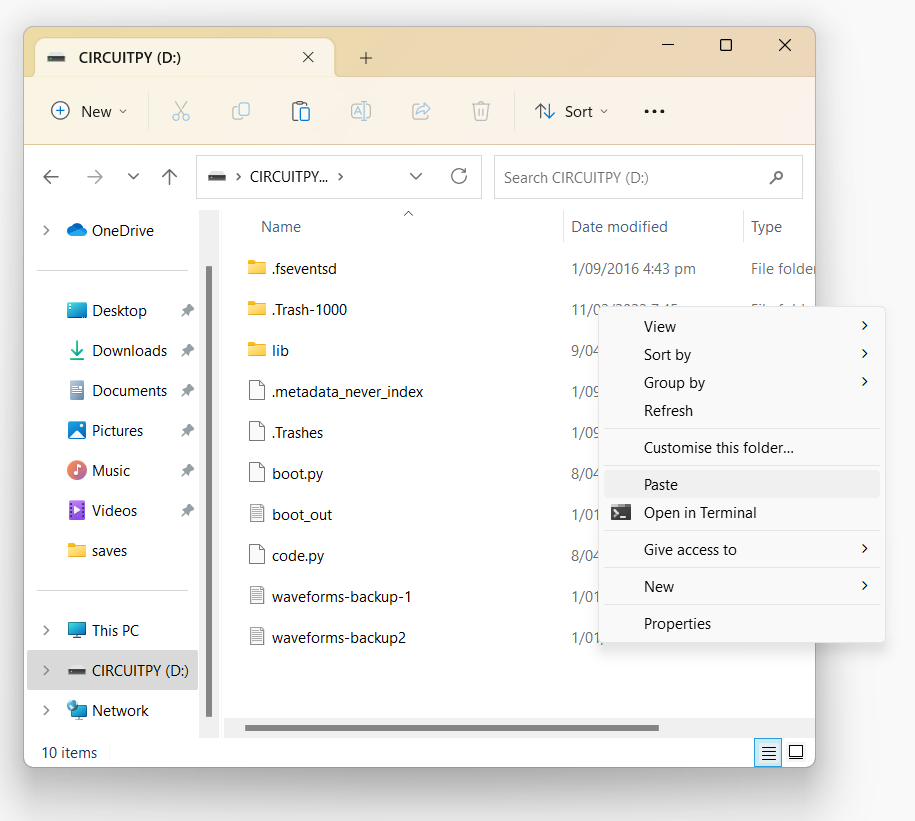
- Navigate to the CIRCUITPY drive.
-
In a blank space, right-click and select "Paste".
(You may need to click "Show more options" if the Paste menu isn't showing at first.)
It should look something like this.
- If prompted to merge or overwrite, say yes. You can safely check the "do this for all the files" option.
- The pedal's screen will refresh a couple of times as the new software is loaded.
-
The update is now complete.
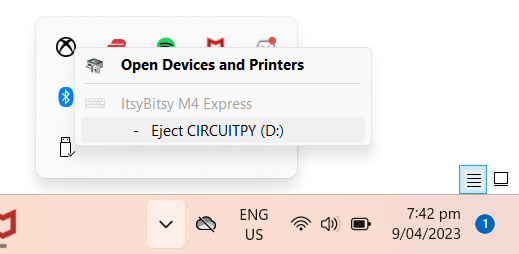
You can now eject the CIRCUITPY drive.
We don't have a macOS machine on which to develop the step-by-step instructions. If you have one, and would like to contribute some guidance, please get in touch. We would be very grateful.
- Power up the pedal. Be sure NOT to hold down the tap button while it's powering up. Wait for all the white-on-blue messages about copyright, backups, etc. to clear.
- Connect the pedal to your PC using a USB data cable.
- Click the link above to download the distribution file. It'll have a name like zebra-trem-v{something}.zip.
- When the download has completed, find the .zip file in your Downloads folder, and double-click it.
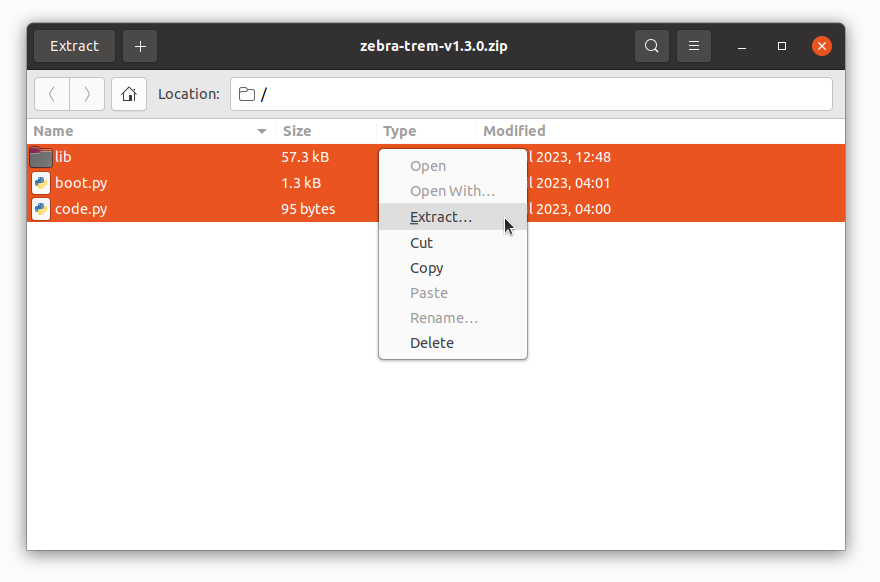
- Select all the files and folders in the .zip file.
-
Right-click and select "Extract".
It should look something like this.
-
In the dialog that appears, select the CIRCUITPY drive.
It should look something like this.
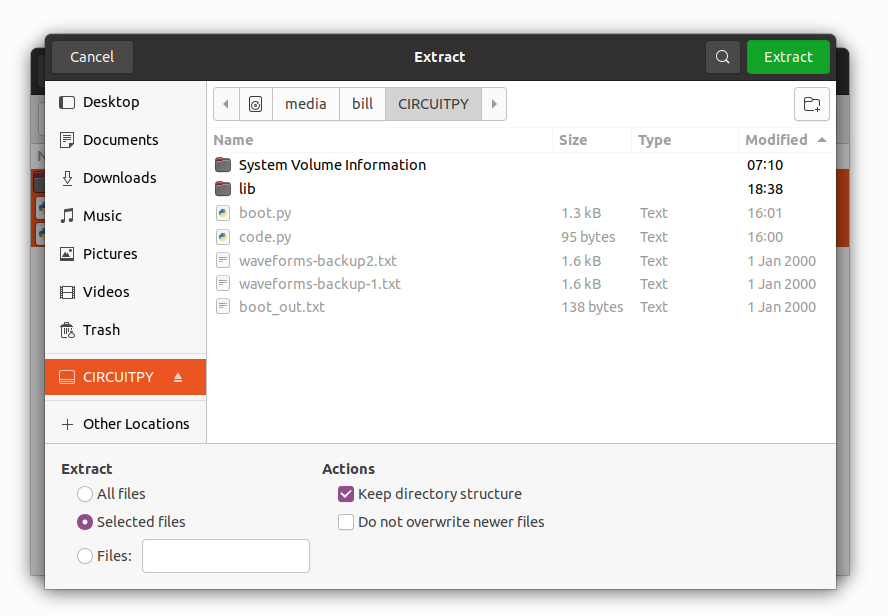
- Click the "Extract" button in the top right.
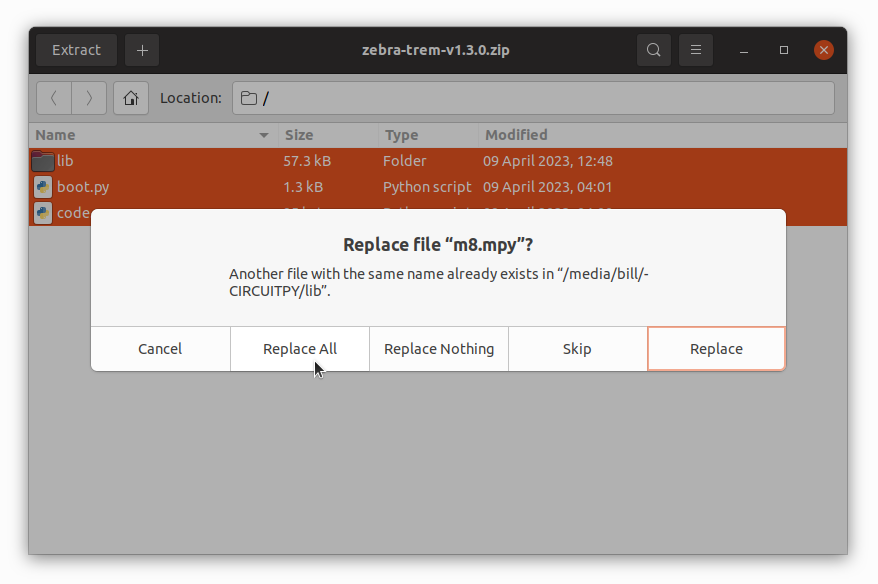
-
You'll most likely see a "Replace file" dialog, similar to this.
Just click "Replace All".
- The pedal's screen will refresh a couple of times as the new software is loaded.
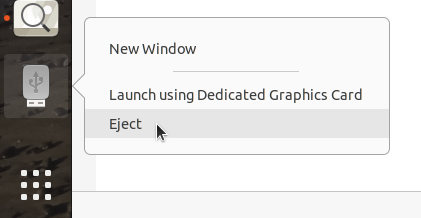
-
The update is now complete.
You can now eject the CIRCUITPY drive.
Older hardware versions
The early Zebra-Trem prototypes out in the wild require a bit of extra help to get the latest software running. Please email us if your pedal isn't working after installing the latest software. We'll send you the right software for your pedal.
Version history
| Download / Version | Release date | Release notes |
|---|---|---|
| v1.0.0 | 31 Dec 2022 | Original release |
| v1.1.0 | 2 Apr 2023 |
|
| v1.2.0 | 5 Apr 2023 |
|
| v1.3.0 | 9 Apr 2023 |
|
| v1.4.0 | 11 Apr 2023 |
|
| v1.5.0 | 6 May 2023 |
|
| v1.6.0 | 20 Sep 2023 |
|
| v1.7.0 | 30 Oct 2023 |
|
| v1.8.0 | 3 Dec 2023 |
|
| v1.9.0 | 1 Feb 2024 |
|
| v1.10.1 | 12 Apr 2024 |
|
| v1.11.0 | 24 Jun 2024 |
|
Zebra-Trem is a mono tremolo pedal with tap tempo, multiple waveform presets, graphical waveform display, and on-pedal waveform editing.
- Power supply should be between 9V and 18V DC, centre-negative, with the standard guitar pedal 5.5mm and 2.1mm jack. Battery operation is not supported. A good quality isolated power supply is recommended for best performance. Current draw will be under 150mA.
- Level sets the effected signal from silent up to around 12dB above the dry signal.
- Waveform (wave|edit on older pedals) selects the waveform preset.
- Edit button press this button, located just above the power jack, to edit, add and remove presets. (On older pedals, press down on the wave|edit knob.) You can try this mock-up of the on-pedal waveform editor.
- Depth sets the intensity of the tremolo modulation. When set to zero, the signal is unmodulated (basically a clean boost controlled by the level control). At 10, the signal can be modulated down to near silence. The depth is displayed on-screen.
- BPM works alongside the tap switch to set the tempo between 40 and 240 BPM. Whichever control was last adjusted sets the tempo. The tempo is displayed on-screen.
- Second-order effect. The digital brain has limitations. At faster tempos, the audio won't always reach maximum or minimum volume. This is most noticeable with triangular or sawtooth waveforms. It results in a second-order tremolo effect with a slower frequency. This means that some of the pulses which should be the same volume are actually at different volumes. We're working on software optimisations to increase the pulse rates the digital brain can manage, so please check back for downloads. Alternatively, we've found that adding a short flat section at the peaks can really improve things.
- Display shows which waveform preset is selected. Guides the user through the edit process.
- Tempo light indicates the tempo. Green/blue pulses indicate the pedal is engaged. Red/white indicate bypassed.
- Bypass is a true bypass switch.
- Tap works alongside the bpm control to set the tempo. The tempo range is dependent on your foot-tapping dexterity. The first tap in a series aligns the start of the waveform with the music. That will be important if the waveform has multiple tap points (the little triangles shown above the waveform).
By connecting the pedal to a PC with a USB data cable, you can update the pedal's firmware, backup waveforms, and restore waveforms. (It might also be possible to perform these functions with a USB-OTG smartphone instead of a PC, but we don't have one so we haven't been able to test that theory.) When the pedal is connected, it will show up as a new USB device called CIRCUITPY.
Two different boot modes are used to enable these functions:
Normal boot mode
- Is selected by powering up the pedal without touching the tap tempo switch.
- Is indicated by the tempo light going blue for one second, red for one second, then blue again for one second while powering up.
-
Allows the user to load firmware or restore waveforms.
- Update firmware: As new firmware updates become available, we post them in the Downloads section of this page.
- Restoring all waveforms: To restore a waveform backup file to your pedal, make a copy of one of your existing backup files. Rename it waveforms-restore.txt. Copy it onto the CIRCUITPY USB device using a USB cable. Disconnect the power and then reconnect it. The pedal display will briefly tell you that the waveforms have been restored. The file can then safely be deleted from your pedal, or renamed to waveforms-backup.txt.
- Loading a single waveform: To restore a single waveform to your pedal, make a copy of the <waveform-name>.waveback file, replacing the .waveback extension to .waverest. Copy it onto the CIRCUITPY USB device using a USB cable. Disconnect the power and then reconnect it. The pedal display will briefly tell you that the waveform has been restored. After that, you should delete the file, otherwise, any changes you then make to the new waveform will be overwritten.
Backup boot mode
- Is selected by powering up the pedal with the tap tempo switch pressed down.
- Is indicated by the tempo light going blue for one second, green for one second, then blue again for one second while powering up.
- A file called waveforms-backup.txt will be automatically created, or overwritten if it already existed. It is a backup of all the waveforms on the pedal. This file can be stored elsewhere for safekeeping.
- A file called <current waveform name>.waveback will be automatically created, or overwritten if it already existed. It is a backup of the current waveform. This file can be stored elsewhere for safekeeping.
How to buy
Our products are usually available from Reverb.com.
When we're out of stock, just contact us to save your place in the queue, and get a 10% discount!
Update - 20 May 2024
We have a few Zebra-Trems in stock just now, and parts to make a few more.
More parts are on their way from overseas, so we expect to be building more soon.
Configuration options
The Zebra-Trem has configuration options which can be modified. Please take care when doing so, because incorrect configuration could stop the pedal from working until the configuration has been corrected. (See below for the factory settings.)
How to configure the pedal
- Connect the pedal to a power supply.
- Connect the pedal to a computer using a USB data cable.
- Locate the CIRCUITPY device connected to your computer, and the
configuration.pyfile at the root level of that device. - Open
configuration.pyin a text editor.
MinimumBpm and MaximumBpm
These values set the range of tempos available on the BPM knob (but not the tap tempo footswitch).
You might find this useful if you're trying to sync with a click track or similar.
For example, if your track is running at 86.5bpm,
set MinimumBpm and MaximumBpm to 86.5.
The tap footswitch will still work as normal, and can be used to set a tempo
anywhere between around 20bpm and 200bpm (depending on your feet).
Turning the BPM knob will set the tempo to the configured value.
ScreensaverSeconds
This determines the length of time between when you last changed a setting and when the screensaver kicks in.
Note: The screensaver will only activate when the pedal is bypassed. As soon as the pedal is re-engaged, or the depth knob or tempo knob is adjusted, the screensaver will be de-activated.
The screensaver was designed because the manufacturers of the display claim that it may deteriorate over time. We have yet to observe this, but are taking their advice seriously. If you do notice the screen deteriorating, please get in touch. We can easily arrange a screen replacement.
LED colours
These settings determine the colours that the tempo LED flashes
The LED operates in two or three phases, depending on the waveform's tap points.
- First Pulse. This is the first beat, and corresponds to the first tap point. Tap points are shown as green triangles above the waveform on the pedal's display.
- Subsequent Pulses. If there are two or more tap points for the waveform, the second and further LED pulses are referred to as "subsequent pulses".
- Non-Pulse. This is the time in between taps.
As well as the three different phases, there are also different colour options for whether the pedal is engaged or bypassed. This is so you can always tell at a glance whether the pedal is engaged.
With three phase options, and two options for engaged and bypassed, there are a total of six different colours to configure. Each colour is made up of Red, Green and Blue components. These are represented in brackets. For example:
(255, 0, 0)would be pure, bright red(25, 0, 0)would be pure, faint red(0, 255, 0)would be pure, bright green
Colours can be more than a matter of taste. With only a limited understanding of people's varying visual needs, we've tried to choose default colours which don't put red and green next to each other. If you find the colours don't work for you, please let us know. We will happily work with you to come up with better options.
If you'd like to tweak the colours yourself, you're in the right place. The numbers you choose for the various Red, Green and Blue values must all be between zero and 255 inclusive. Whole numbers only - no decimals.
The LED can draw enough current to have an audible effect on your signal. For that reason, we've tried to choose colours which all draw a similar current. This can be approximately achieved by making sure the numbers for the three colours add up to about the same value in each phase of the LED.
Restoring factory settings
If you need to restore the factory settings for your configuration file,
simply replace the contents of the configuration.py file with the following
# It is strongly recommended that you make a
# backup of this file before modifying it.
# Changing the names of the parameters will
# stop the pedal from working.
# Other than that, fill your boots!
class Configuration():
	# The RGB colours of the tempo / on/off LED.
	# Each value can be between 0 and 255.
	# The tempo light "pulses" both when the effect
	# is "on" and when it is "bypassed".

	# You might notice some noise when the pedal
	# is engagedif the "pulsing" LED draws
	# significantly different current than the
	# "not pulsing".
	# For that reason, it's advisable to keep the
	# total of Red+Green+Blue approximately the same
	# between the three LED phases:
	#     EngagedLedFirstPulseColour
	#     EngagedLedSubsequentPulseColour
	#     EngagedLedNonPulseColour
	# Assuming, for example, that
	# EngagedLedFirstPulseColour = (80, 80, 80)
	# 80 + 80 + 80 = 240
	# then the RGB values for
	# EngagedLedSubsequentPulseColour and
	# EngagedLedNonPulseColour should also
	# add up to 240.
	EngagedLedFirstPulseColour = (5, 100, 5)
	EngagedLedSubsequentPulseColour = (45, 45, 10)
	EngagedLedNonPulseColour = (10, 10, 110)

	# The constraints above don't apply when
	# the pedal is bypassed.  The bypassed signal
	# is not affected by LED current draw.
	BypassedLedFirstPulseColour = (80, 80, 80)
	BypassedLedSubsequentPulseColour = (30, 0, 0)
	BypassedLedNonPulseColour = (0, 0, 0)

	# Number of seconds between the last tweak (waveform, depth or bpm) and when the screensaver kicks in
	ScreenSaverSeconds = 300

	# The range of the BPM control:
	MinimumBpm = 40.0
	MaximumBpm = 240.0
Nice things people have said
-
WOW!! This is coolest Trem ever!! Hands down one of the best looking pedals of all time!! Pushing a 1000 pedals in my collection, I own alot of incredible good looking pedals, the Zebra, lights, and wave form screen make this one of my top fives! I haven't even dove into making my own custom wave forms as yet, why I bought it besides the incredible art. Been playing presets, this is by far my fav Trem, and I own many!! Just buy it, you won't regret itl!!
(from a Reverb.com customer) -
Great new pedal maker. Thorough and friendly communication, offers to help learn the pedal, and most importantly, a brilliant trem pedal. Great for ambient sways but I love the way it's reacting with some serious stacking before it. Really easy to get going with. I'll definitely look at whatever these guys make next
(from a Reverb.com customer) -
Brilliant pedal, great support and Bill is on hand if you need help. 5 stars
(from a Reverb.com customer) -
Absolutely incredible pedal and top notch service - top level EBayer - thanks!!!!!
(from an Ebay.com customer)
A short list, but, well, it's early days : )
Thanks and acknowledgements
- Thanks to Zanuar at Darkink on Fiverr for the cool zebra graphic. It was a pleasure working with you!
- Thanks to David from Tri Pedal Reviews, who provided a lot of useful feedback when the Zebra-Trem prototype was on tour, and made a couple of great videos featuring the pedal.